For UK plumbers and heating engineers. Set up your business, take a job from enquiry to payment, and find the right instruction when you need it.
Reviewed 2026-09-08Online and A4 print edition
Example only. Diagrams explain the job steps. Screenshots show the real application with made-up customer details; they do not show a live customer account, delivered message or completed payment. The PDF is the general edition. Print the signed-in manual when you want it to include your current setup summary.
The job at a glance
1Enquiry
2Customer & property
3Job & quote
4Acceptance
5Diary & work
6Certificate
7Invoice
8Payment & follow-up
A job, a quote, an appointment and an invoice are separate records. Creating one does not automatically complete the others. Check the result at the end of each procedure.
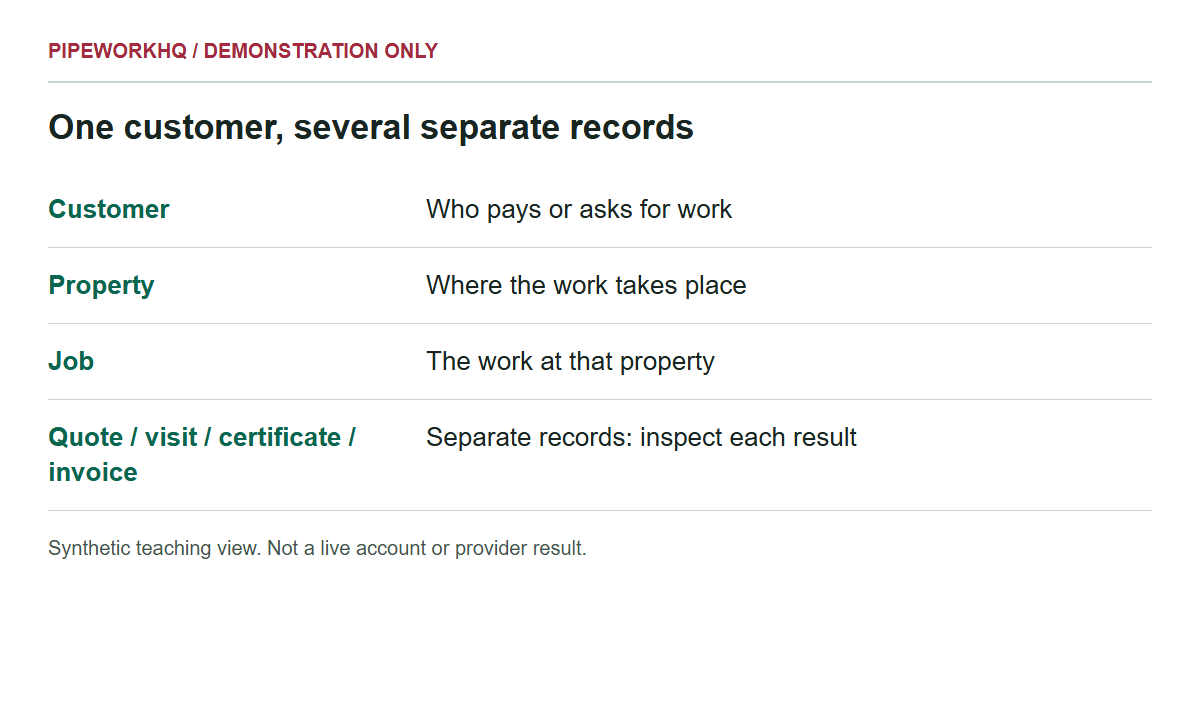
How the records fit together
Customer
The person or company paying for the work.
Property
The place where you carry out the work. One customer can have several properties.
Job
The work at that property. Quotes, visits, evidence and invoices refer back to it.
If something has not appeared
Did a success message appear?
If not, read the error and check your connection before trying again.
Was it saved in the right business?
Check the selected business, then the record list and any filters.
Saved but not received?
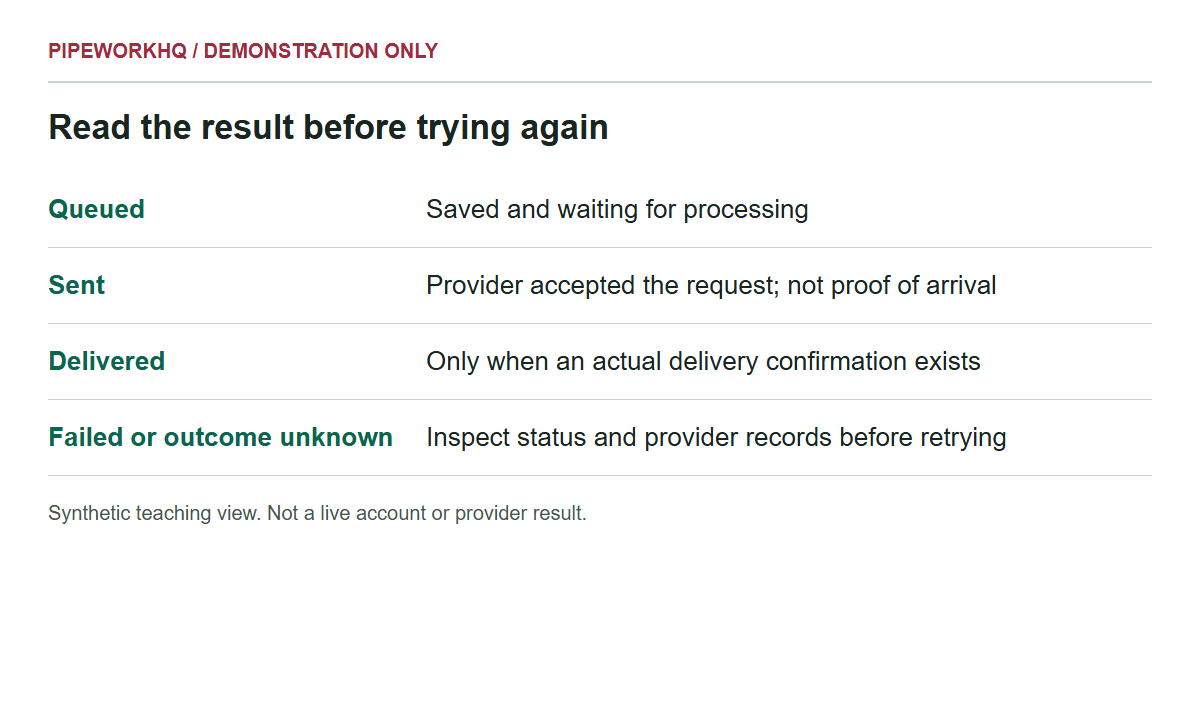
Check the sending or payment status. A saved draft is not a sent message or a paid invoice.
Still unclear?
Keep the record reference and use Help & support. Check the record before repeating a send or payment action.
Using these instructions
Before you start
What you need ready, including access and connections.
Procedure
Work through the numbered steps in order. Bold labels match controls in the app.
Check the result
Confirm the work was saved or sent successfully.
Fault finding
What to check when the expected result does not appear.
A locked feature may need a different plan, business role or connection. Only an authorised owner or administrator can change business connections; this manual is read-only.
This is a guide to operating the software. It does not replace training, manufacturer instructions, professional judgement or the standards you must use for the work.
Registration can be gated by the environment. This procedure describes the available form, not a promise that public sign-up is open on every site.
Before you start
Have an email address you can open and your business trading name ready.
Use your own account. A teammate who has received an invitation should follow that invitation instead of registering a separate business.
Check that you are using the intended PipeworkHQ site. A beta or test environment is not evidence that live payments or customer delivery are enabled.
Procedure
Open registration
Open /register for Create your account. If the site shows We're launching soon instead of the form, use the beta registration link offered there or contact support. Do not keep submitting to a closed registration page.
Enter the account details
Complete Full Name, Email Address, Password and Business Name. In Business identity, choose How are you trading today? and enter the legal details requested for that choice. I will add this later is available. Gas Safe Number is optional here; entering it does not verify competence. Use Show password or Hide password to check typing on a private screen; the toggle does not submit the form.
Check optional codes
Enter a genuine Voucher or Savings Code or Referral Code if supplied. A promotion link may pre-fill a read-only savings code. A referral code and a subscription promotion are different; do not assume either has reduced a bill until the relevant confirmation appears.
Create and verify
Select Create Account once and wait. Where Verify your email appears, open the verification message, follow its link, return and select I have verified my email. Use Resend verification email if needed. A reserved promotion is not attached until this verification step succeeds.
Complete the first visit
Continue through the business profile setup. On subsequent visits use Sign in at /login with Email Address and Password. If asked to Choose a business, select the business you intend to work in.
Recover a password
On Sign in, select Forgot password?, enter Email Address and select Send reset link. Check the inbox and spam folder. The neutral confirmation does not disclose whether an account exists. Follow the received link, then return to Sign in.
Check the result
You reach your business dashboard or its onboarding form, not a second empty business created by mistake.
The displayed user and Active business, when present, are correct.
Any reserved promotion appears in Billing & Subscription before you rely on it.
Fault finding
Problems and checks for Create an account and sign in
What you see
What to do
Email and password do not match.
Check the email spelling and use Forgot password? rather than creating another account. Wait if too many attempts are reported.
The verification step says the email is not verified.
Open the newest verification message and complete its link, then retry I have verified my email. Do not send verification links or passwords to support.
The business profile cannot be loaded.
Allow the account setup to finish, then refresh once. If it persists, report the problem with the page and time; do not register the same business again.
Account creation partly succeeded.
Use the page's retry or resume action while signed in as the same user. Do not delete the account or register again to repair a business-creation failure. Keep the displayed non-secret reference for support; never send your password.
Have your business contact details, business address and applicable registration records to hand.
Use an owner or administrator account for changes to business profile and identity.
Decide whether customers should see your full address, especially if you work from home.
Procedure
Finish onboarding
At /register/onboarding choose Type it in yourself, Scan Business Card, Scan Van Signage or Import from Website. For a scan, use a clear image within the stated limit. Review every extracted name, email, phone number and address against your own records. Extraction is a starting point, not verification.
Save the initial profile
Complete Business Name, Contact Name, Email, Phone and Address Details as applicable. Select Finish Profile and wait for the next screen. The optional install step can be skipped. If extraction fails, use Type it in yourself.
Maintain customer-facing details
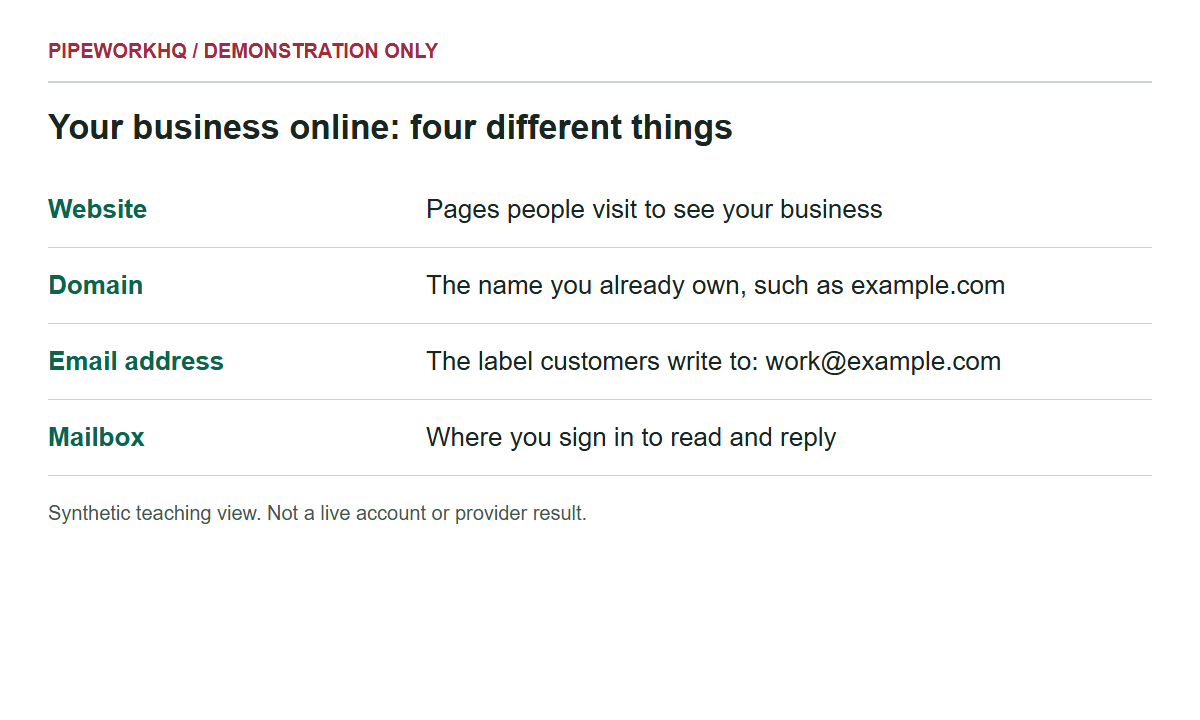
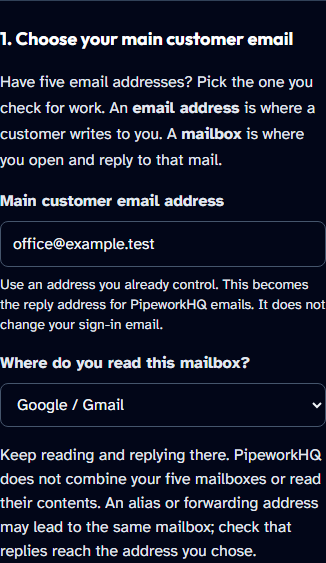
On the dashboard checklist, Complete your business profile is the sole essential step. In Settings, Business profile, save the trading name and a working public phone number or main customer email. Your business online holds the main email choice. Check address visibility, especially for a home address, and select Save profile. Use a mailbox you already own; a saved company number is on file, not a verified Companies House connection.
Set document identity
Open Business identity. Check Legal structure, Effective from, Trading name, the applicable legal name and Companies House number, and Supplier business address. Read the acknowledgement about document history and external updates before selecting Save identity. Do not use a guessed company identity to complete the form.
Record relevant trade credentials
This checklist step is optional for general setup, not permission to do regulated work without the required competence. Open Accreditations & Web Badges, enter only registration numbers and expiry dates supported by your records, and select Save Qualifications. These are self-declared records, not independent verification. Team members' individual competence records are managed in Team.
Check a change of business structure
After changing identity, review the result and any message asking you to check Stripe details. Draft quotes and invoices refresh identity when issued; sent quotes, issued invoices and locked or completed records retain their original identity. Update external organisations separately where required.
Connect Stripe to get paid by card
This is optional. When you need card payments on a supported plan, the owner uses Settings, Payments and completes Stripe's own checks. Follow procedure 20 and check both charges and payouts. A setup tick is not evidence of a customer payment or money arriving in your bank.
Publish your business website
This is optional. Open Your website at /dashboard/website, choose an eligible hosted /e/ address, review the public business details and publish deliberately. Follow procedure 27 for approved work and real service areas. Reserving an address is not publication; a paid website is not required to share an issued quote.
Review accounting and exports
This is optional. Use Invoices, Export Xero CSV and follow procedure 29 to check the file before importing it. Direct accounting connections and automatic posting are not available yet. You can use customers, jobs and quotes without completing every optional setup task.
Connect your social channels
This is optional. In Settings, Integrations, save Bluesky or Threads details only for accounts you control. Settings saved, unverified means the details were stored; it does not mean the social site accepted a sign-in or post. Procedure 04 explains how to review and approve each post. You do not need a PipeworkHQ website to post to Bluesky or Threads.
Invite your team
This is optional. In Team, create the intended role's invitation and privately copy and share its link yourself. No invitation email is sent automatically. Follow procedure 24 and check the person has joined as an active member; making a link alone does not complete this step.
Check the result
The saved profile shows a working reply address and the intended public-address choice.
Business identity has the intended effective date and document address.
A newly prepared document uses the right details; historical paperwork has not been assumed to change.
The essential profile is complete; the six optional steps are choices, not a requirement to enable services you do not use.
Fault finding
Problems and checks for Set up business details, identity and accreditations
What you see
What to do
The logo appears uploaded but the website has not changed.
Select Save profile or Save Branding in the screen you used. Uploading alone is not the final save.
Identity saving is rejected.
Complete the required legal name, company number where applicable, address and effective date, and read the acknowledgement. Ask the owner or administrator if you only have view access.
A sent invoice still shows the old identity.
Historical documents deliberately retain their original identity. Do not try to rewrite them through profile settings; discuss the appropriate correction with your accounts operator.
Sign in and confirm the business name before creating or changing records.
Save the current form before changing business or moving to another device.
Remember that menu visibility depends on role and feature access.
Procedure
Check the overview
Open Dashboard. Active Quotes shows open quotes, including unsent drafts and issued, viewed or engaged quotes; it does not mean every quote is awaiting a customer decision. Pending Invoices shows outstanding invoice value; Win Rate summarises decided quotes. Use these as prompts to inspect records, not as bank balances or a complete set of accounts.
Choose the next useful setup task
The checklist has one essential task: Complete your business profile. The other six tasks are optional. Set up only the services your business needs. You can use customers, jobs and quotes without completing them all. A tick means details were saved; it does not prove a payment, message or public post succeeded.
Use the daily work menu
Under Today, use Diary for dates, Jobs board for engineer allocation and New job to begin work. Under Winning work, use Leads, Quotes and Your website. Under Doing the job, use Jobs, Certificates, Calculators, Ask Mate and Scan paper diary.
Find business administration
Getting paid contains Invoices, Receipts and, when entitled, Contracts. Running the firm contains Customers, Messages, Team, Apprentice, Reviews & growth and Marketing. Setup contains Connections, Your data, Price list, Settings and Help & support.
Open a saved job
In Jobs, use Search jobs by number, customer or address and Filter by status. Select View job on the correct record. All statuses removes the status restriction. A customer name alone may identify several jobs, so also check the address and job reference.
Use a small screen or collapsed menu
On a phone, select Open menu, choose a destination and use Close menu if needed. On desktop, Collapse reduces the menu to icons; Expand menu restores the labels. The current page is identified in the navigation. Use browser zoom or reading preferences where offered.
Switch business or sign out
If you belong to more than one business, use Active business and choose the intended entry. The page reloads for that business. At the end of a shared-device session select Sign Out. Do not assume closing a browser tab signs you out.
Check the result
The active business and page heading match the work you intended to do.
A record search has the expected status filter and address.
You can return to the relevant list without creating a new record.
Fault finding
Problems and checks for Find your way around the dashboard
What you see
What to do
Contracts or field-work items are missing from the menu.
Contracts is hidden without the required entitlement; accountant navigation omits field-operation pages. Ask the owner to check access rather than creating another account.
A list looks empty.
Clear search text, choose All statuses where available and check Active business. A loading failure is not proof that records were deleted.
An icon or status is difficult to identify.
Expand the menu and use text labels where available. Report controls that remain unlabelled or inaccessible; do not guess at financial or destructive actions.
You can publish to your PipeworkHQ website gallery, Bluesky and Threads after reviewing the post and confirming permission. Facebook, Instagram, Google Business Profile, LinkedIn and Nextdoor posting are not supported. Saving details or preparing photos does not publish a post.
Before you start
Open a genuinely completed job in the correct business, using an owner or administrator account with the required feature access.
Use only work and photos the customer has permitted to be public. Check for faces, names, private addresses, contact details, documents and identifying details.
For Bluesky or Threads, save settings for an account you control in Settings, Integrations. Saved settings are unverified; no website is needed for social-only posting. Website gallery needs an active eligible published website.
Procedure
Set the writing preferences
In Marketing Studio open Connections & Voice. Under Brand voice choose Tone, Trade and Service area. Check Phone (CTA), Website (CTA), Emoji and Preferred hashtags, then select Save brand voice. Keep the service area and contact details factual.
Prepare the completed job's draft
Open Draft Posts in Marketing. Choose the genuinely completed job from Pick a completed job... and select Generate draft. Use its existing card if one is already present. Draft generation is private; completing a job or preparing a draft does not publish work, send a message or approve photos.
Open review and choose destinations
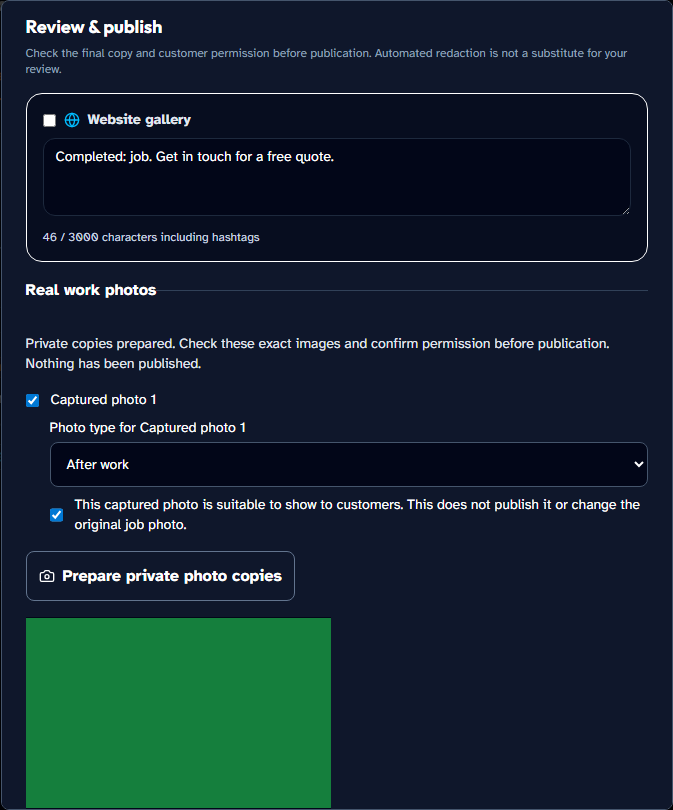
Select Review & publish on the correct card. No channel is selected for you. Choose Website gallery, Bluesky or Threads only where you intend to publish, then check the entire final text. Remove private customer details and unverified claims. Your website's separate editor remains text-only; use this Marketing review for real photos.
Select the exact real work photos
In the photo selection, tick the intended current job capture, such as Captured photo 1. Choose Before work or After work under Photo type for Captured photo 1 and confirm This captured photo is suitable to show to customers only when true. These choices belong to the private approval, not the original job record. An explicitly private capture cannot be used. Do not replace a missing or restricted photo with an old download link.
Prepare private photo copies
Select Prepare private photo copies. Wait for the prepared images and the private, awaiting approval state. Inspect the exact copies shown, not only the original thumbnails. Preparation copies and sanitises images for review; nothing is published. JPEG, PNG or WebP still images must be within the stated limits: up to 10 MiB and 24 megapixels per source, with no more than four selected sources.
Include and describe the reviewed copies
Choose Include these prepared photos in the selected post when those are the copies you intend to publish. Website gallery and Threads each support one photo; Bluesky supports up to four. Enter Photo description for people who cannot see it, describing the work without private identifying details. If the job's photo association, visibility or consent details change, prepare and review again when asked.
Confirm permission after the final review
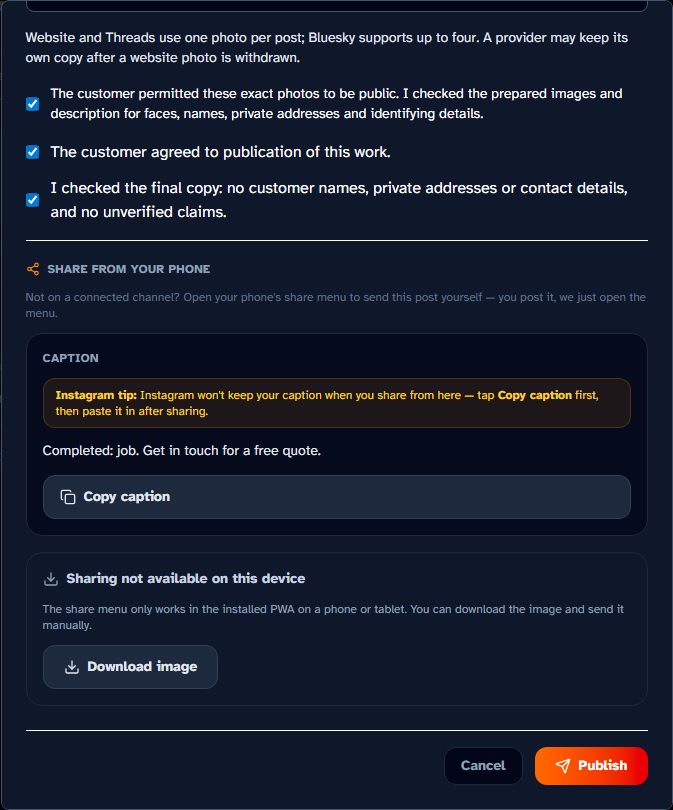
Tick The customer agreed to publication of this work and the final-copy privacy check only when true. For photos also confirm: The customer permitted these exact photos to be public. I checked the prepared images and description for faces, names, private addresses and identifying details. Customer-visible or privately shared with the customer is not public permission. Changes to copy, channel selection or photo description require fresh consent checks.
Publish once and check each result
Select Publish once after the final checks. Read the result for each chosen destination, then open that destination and inspect the post. A reference number means the social site accepted the request; it does not prove anyone saw or read it. A Pending or Unconfirmed post may already be public, so do not submit another attempt.
Prepare a later channel without repeating an earlier one
If a card offers Prepare Bluesky or Prepare Threads after a prior website or other channel result, use that control to add the missing channel's private text. Review its copy and choose that destination deliberately. Existing published or unconfirmed receipts remain authoritative; a missing text body does not make an earlier publication safe to retry.
Withdraw website work or share manually
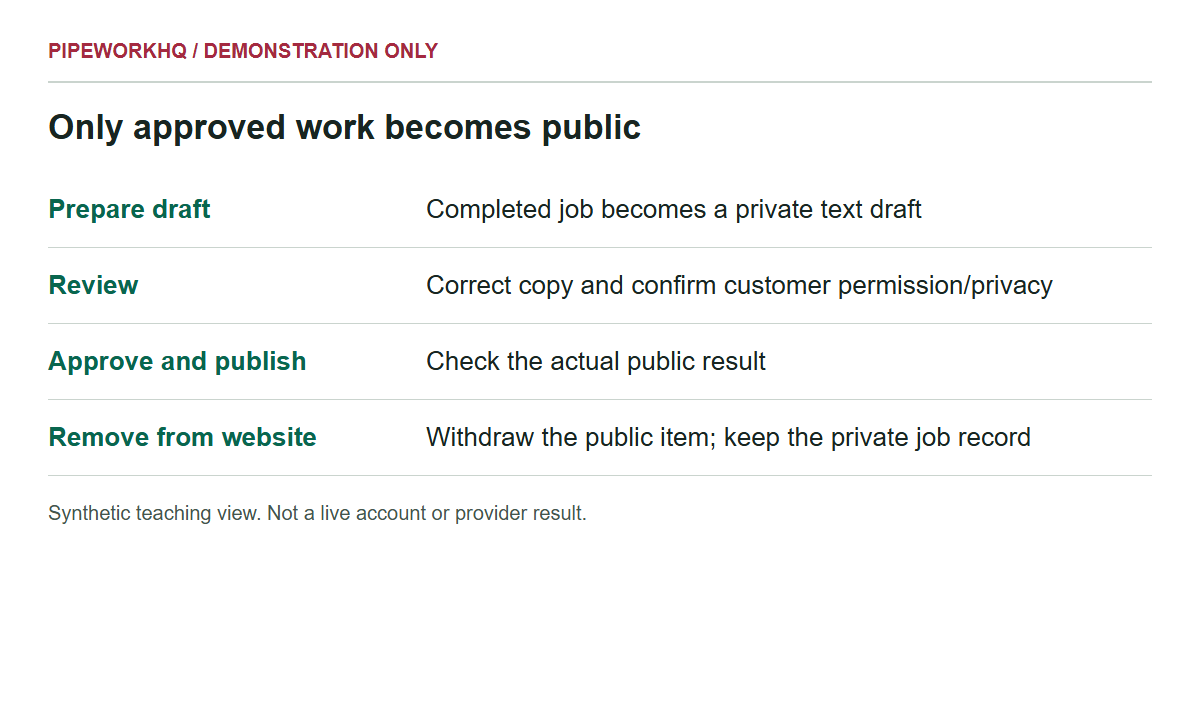
In Your website, Approved website work, choose Remove from website, then check the public page. The private job remains. Removing it from the website does not remove copies already posted to a social site; remove those on that site. Share from your phone opens your phone's share menu so you can choose an app and finish the post yourself. Opening the menu does not publish anything.
Prepare private photo copies
Actual application with made-up example details. The review window shows a selected job photo and its private prepared copy. Nothing has been published. The green block is a made-up example, not a customer's photograph.
Check consent before publication
Actual application with made-up example details. This separate view shows the final photo permission and privacy checks with the Publish button. Confirm them only after checking the exact images, description and destinations.
Check the result
The selected captures belong to this job, the exact prepared copies were inspected, and public permission is genuine.
The text and photo description reveal no private details or unverified claims.
Only intended destinations were selected; each outcome was checked without reopening a published or uncertain attempt.
The website was checked separately from any copies posted to social sites.
Fault finding
Problems and checks for Prepare and approve marketing posts
What you see
What to do
There are no jobs in the selector or the photo is unavailable.
Check the active business, genuinely completed status and current job photos. Explicit private restrictions cannot be overridden. Do not mark unfinished work complete or paste a raw image URL to bypass the restriction.
Preparing a photo fails or the review asks you to prepare again.
Check format, file size, pixel dimensions and the current capture selection. Inspect the job's association and privacy settings. Prepare new private copies and review them; do not assume a changed original is the previously approved image.
A channel is unavailable or credentials were rejected.
Check Settings, Integrations and the account details for the social site. Settings saved does not prove sign-in worked. The website gallery needs a published PipeworkHQ website; Bluesky and Threads do not. Other social sites cannot be enabled from this screen.
Publishing is pending, unconfirmed or reports mixed channel results.
Inspect the destination and keep the draft and channel references. Do not repeat published, publishing or unconfirmed attempts, even if text is missing. Only a definite not-sent failure may offer an explicit review-and-retry after its cause is fixed. Ask support to reconcile an unknown outcome; do not create a replacement post to bypass it.
This section covers the real lead form and conversion controls. Generic inbox wording is not a guarantee of automatic WhatsApp ingestion.
Before you start
Have the caller's name or business name and a usable phone number.
Check whether the enquiry or customer already exists.
Record only relevant information; do not put passwords, alarm codes or payment-card details in notes.
Procedure
Look for the existing enquiry
Open Leads. Check the name, contact information, project description and status of any existing entry. A website enquiry or manually entered lead is not yet a booked job.
Add a telephone or site enquiry
Select Add Lead. Choose Individual or Business. Fill Customer name or Company / trading name and Phone. Email, Project type, Site address and Notes about the job are optional, but a clear address is useful before a visit.
Save and check
Select Save Lead once. Wait for the form to finish and locate the new entry in Leads Inbox. Check that the phone number has not lost digits and that the description identifies what the customer asked for.
Keep its status current
Use the lead's Status control to record the appropriate follow-up state shown in the list. Check the saved state after changing it. Changing a lead status alone does not arrange a diary appointment or notify the customer.
Convert to a customer
For a new customer select Convert & start job. This creates or resolves the customer and opens the job form with context from the lead. Review all pre-filled details. For an already converted lead, use Create job instead of trying to convert it again.
Agree the next action
Create the job only when the customer and property are clear. Agree the visit or quote arrangement with the customer using your normal communication route, then schedule the saved job separately.
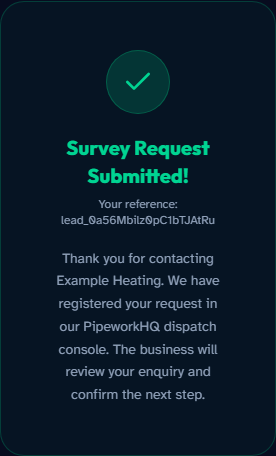
Customer enquiry received
Actual application with made-up example details. The customer's enquiry has been recorded and a reference is shown. This is an enquiry receipt, not a booked appointment or accepted price.
Check the result
The enquiry is visible with the intended contact details.
The converted customer is the right person or business.
The resulting job is checked separately for address, work and schedule.
Fault finding
Problems and checks for Record an enquiry and turn it into work
What you see
What to do
Save Lead will not complete.
Name and phone are required. Correct the missing field, keep the entered notes and retry once after reading any error.
Conversion fails.
Check Customers for a record already created before repeating the action. Refresh the lead and use Create job if it now shows a linked customer.
No enquiry has appeared from an external channel.
Do not assume every WhatsApp or social conversation is imported. Confirm the customer enquiry through the channel used and add it manually if necessary, checking for duplicates first.
Search by name, phone or email before adding a record.
Have the customer's contact details and, if known, the complete property address.
A billing customer and the person occupying a property may be different; establish which record you need.
Procedure
Search the customer list
Open Customers and use Search customers by name, phone or email. Check Business or Landlord indicators where shown. Use View to inspect the record before creating another customer with similar details.
Choose the correct customer type
Select Add customer. Choose Individual and enter First name or Last name, or choose Business and enter Business name. Add Phone and Email where available. Without a usable contact address or number, customer messaging cannot reach them.
Record contact preferences accurately
Use the review-email refusal checkbox only when the customer has actually refused. The screen states that job, quote and invoice messages are unaffected. This checkbox is not a general setting for every type of customer communication.
Add an address only when complete
Property address is optional. If using it, enter Address line 1, Town / city and a valid Postcode together; Address line 2 is optional. Leave the address blank if it is genuinely unknown instead of inventing an address to pass validation.
Save the customer
Add relevant Notes and select Save customer. Wait for Customer saved. Open View and check Contact details, Notes and Properties. A property supplied in the add form should be available as the customer's property.
Use the record for repeat work
Select New job from the customer record or list. In the detail page review Properties, Appliances and Jobs. Expand Service history (logbook) for an appliance when available. The detail page is mainly a record viewer; do not assume it has an edit or delete facility that is not shown.
Check the result
There is one intended customer record, with usable contact details.
The property is the correct site rather than a guessed billing address.
Existing jobs and appliance history are checked before starting repeat work.
Fault finding
Problems and checks for Add customers and inspect their records
What you see
What to do
An optional address prevents saving.
Either complete line 1, town and a valid UK postcode or clear the optional address fields. A partly completed address is not accepted.
No properties are linked.
Create the customer's job with the correct site address. The job links to a property, so check that link afterwards rather than adding the customer again.
The service history will not load or contact details are wrong.
Use Try again for the logbook. For a record correction without an available edit control, ask support with the customer reference; do not use duplicate records as a correction method.
You can import a CSV file or paste customer rows. Excel .xlsx files, downloads of failed rows, direct imports from accounting software and moving old jobs, invoices or service history are coming soon.
Before you start
Keep an unchanged copy of the original list and remove records you do not intend to import.
Export the list as CSV or prepare rows to paste. Direct Excel .xlsx upload is not supported.
Every imported row needs a name, address line 1, town and postcode. Email, phone and boiler make, model and serial are optional.
Procedure
Prepare the file
From Your data choose Start an import, or open Import my customers. Download our template provides the expected columns and an example row. Replace the example with your real authorised records; do not import the template example as a customer.
Load the data
Choose a CSV file or paste the rows in the text box. Set The first row contains column titles (a header row) to match the file. Select Next: match columns. Column order does not have to match the template.
Match each field
Check the suggested column for Customer name, Address line 1, Town / city and Postcode. Match optional contact and boiler columns if present. Use Not in my file for optional fields that genuinely do not exist. Do not map a single address cell to several required fields without first splitting the data properly.
Inspect the preview
Read several rows, including names with commas, business customers and any incomplete addresses. The preview shows only the first displayed subset, not a guarantee that later rows are correct. Use Back to repair the file or change the mappings before importing.
Run the import
Select Import and keep the page open while progress runs. The importer sends batches. A failure part way through can leave earlier batches saved; do not assume that an interrupted import made no changes.
Reconcile the result
Read Added / matched, Errored and Skipped before sending. Open Show row-by-row details. Added / matched includes existing matches and is not solely a count of new customers. Check View my customers against the original list, including email addresses, before deciding which rows to retry.
Retry only the necessary records
Correct missing required fields and reported row errors in your retained source file. Use Import another file or Back to column matching as appropriate. Check saved customers before retrying a batch whose result was uncertain.
Check the result
The number of saved or matched, errored and skipped rows is reconciled with the intended source rows.
A sample of names, addresses, contacts and boiler details matches the original.
Invalid email values have not silently become missing contact details: the current importer drops an invalid email rather than failing that row.
Fault finding
Problems and checks for Import a customer list from CSV
What you see
What to do
No customer rows are found.
Check whether the file contains only a header, whether pasted rows are empty and whether the header checkbox matches the data.
Rows are skipped.
Complete the four required fields and correct their column mappings. Read row details before sending again.
You need jobs, invoices, service history or an error spreadsheet imported/exported.
Those migration functions and a downloadable failed-row file are not available here. Keep the original records and arrange a separate migration discussion with support.
Choose an existing customer or be ready to add one.
Have the complete site address, including a valid UK postcode.
Agree enough detail to describe the proposed work. This form records work; it does not decide engineering suitability.
Demonstration only. Figure 08. Teaching diagram. Creating a job does not book it, send a quote or receive payment.
Procedure
Start from the best record
Use New job from Customers for repeat work, Convert & start job from a lead, or New job in the menu. Check any preselected customer. Use change if the wrong customer is selected.
Add a customer if needed
Choose Add new customer, select Individual or Business and fill the required name. Phone and Email are optional but useful. Select Save & use this customer and confirm that the saved customer is selected before continuing.
Enter the site address
Under Property address complete Address line 1, Town / city and Postcode. Add address line 2 and Property type if known. Do not confuse the landlord's correspondence address with the premises where the work is taking place.
Describe the work
Under Job details choose Job type and Priority. In Work to be done add a clear description and quantity. Use Add item for separate work and Remove item for an accidental row. The Gas Safe flag records that a work item is gas-related; it does not authorise someone to perform it.
Check customer-visible notes
Read Notes before saving; the form describes this as information the customer should see. Keep private access information, internal complaints and credentials out of this field. Prices are entered line by line in the quote, not in this job list.
Create once and inspect the quote hand-off
Select Create job & build quote. Wait through property creation, linking and job creation. The quote builder should open with the job selected. Confirm the customer and site again. If you are not ready to price, close the quote form and find the saved job in Jobs.
Carry on from the job
Open the saved job. The next action takes you to the visit, unfinished records, invoice or next service. Readings and records lists the records linked to this job. Invoice and payment shows the linked invoices and their outstanding balances. Select a record or invoice to open it; Back to job returns you to the same work. A saved copy is labelled when its current status cannot be confirmed.
Check the next service
Read Next service at this property. Use Open property and appliance history, then open the appliance. An owner, administrator or engineer can set Next service date, add the Reason for changing the date and select Save service date. Use the agreed service date, not the invoice payment date. This does not change a gas safety record or book a visit. Clearing the date stops service reminders for that appliance.
Know when a reminder is due
PipeworkHQ checks recorded appliance service dates daily and queues one reminder per due date, up to 30 days beforehand. It uses the current primary property contact and their email or text permission. It does not require a paid invoice. A booked service linked to that appliance stops an unnecessary reminder. A queued reminder is not confirmation of delivery; check the message status.
Check the result
A saved job appears in Jobs with the intended customer and address.
The quote builder's Job field identifies that same job.
The job has not been mistaken for a diary booking: date, engineer and progress are separate checks.
Fault finding
Problems and checks for Create a job for the right customer and property
What you see
What to do
The form asks for an address or item of work.
Complete line 1, town, valid postcode and at least one work item. Do not enter filler merely to create the job.
The page fails after Creating property or Creating job.
Check Jobs and the customer's Properties before submitting again. Some steps may have saved already.
The quote selector says Loading selected job.
Wait for the saved job to load. Do not choose another job just to dismiss the message. If it persists, open Jobs to verify the new record.
The manual quote form creates one option. It does not expose every quote revision or multi-option capability that may exist elsewhere in the system.
Before you start
Create and check the job first.
Have the agreed scope, quantities, selling prices and quote validity period ready.
Have the correct business identity and VAT settings checked by the person responsible for your accounts.
Procedure
Open the builder
From Quotes select Create New Quote, or continue from Create job & build quote. Choose Job and confirm the customer and property. Set Quote title so the proposal is recognisable, and set Valid for (days) to your intended period.
Enter priced lines
Under Line items enter Description, Qty and unit price in pounds. Use Add line for further lines and Remove line for an unwanted row. Check every quantity and price; a blank or zero price must be deliberate. The saved Price list cannot yet populate these lines automatically.
Review VAT
Check every line's VAT rate and any Manual VAT rate warning. Automatic classification does not infer relief from words such as heat pump or low-carbon. Historical agreed rates and explicit manual selections are not evidence of current eligibility. Check the actual work and evidence with your accounts operator before issuing; this manual supplies no tax decision.
Use emergency pricing only when intended
To set the rates, open Settings, Emergency Call-outs. Choose Offer emergency / out-of-hours call-outs, check Rate multiplier and Fixed call-out fee (£), then select Save emergency settings. Where your eligible website is published, check its displayed emergency rates after saving. Back in the quote, use Emergency / out-of-hours call-out only when intended. Check the surcharge and saved total: the multiplier applies to labour, not every line. Do not also enter the same surcharge manually.
Save the draft
Read Net, VAT and Total, then select Create Quote (Draft). Wait for the modal to close and locate the Draft in the quote list. Creating a draft is not customer approval and does not email it.
Inspect before issuing
Search by customer or quote reference and confirm the title, validity and total. If a figure or job link is wrong, do not proceed to Get customer link. The current list has no general draft-edit control; arrange a correction with support rather than sending an incorrect proposal.
Check the result
The saved Draft belongs to the intended job and customer.
The saved total, including VAT and any emergency surcharge, agrees with your checked pricing.
No customer has been told the quote is sent merely because a draft was saved.
Fault finding
Problems and checks for Prepare and check a quote draft
What you see
What to do
No job can be selected.
Create the job first and wait for it to appear. A quote requires a job.
VAT preview differs from your intended treatment.
Stop before issuing. Check the line rate, any manual-rate warning and VAT settings with your accounts operator; do not adjust descriptions solely to force a tax result.
You need to revise an already sent quote.
Do not overwrite or reuse a customer link for different work. Ask support how to correct or replace it; this screen does not let you edit every part of an issued quote.
Check the quote draft and business identity before issuing it.
You do not need a paid website, hosted /e/ address or custom domain to share a quote.
Confirm the recipient's contact details. The full quote link provides access to customer paperwork and must be treated as private.
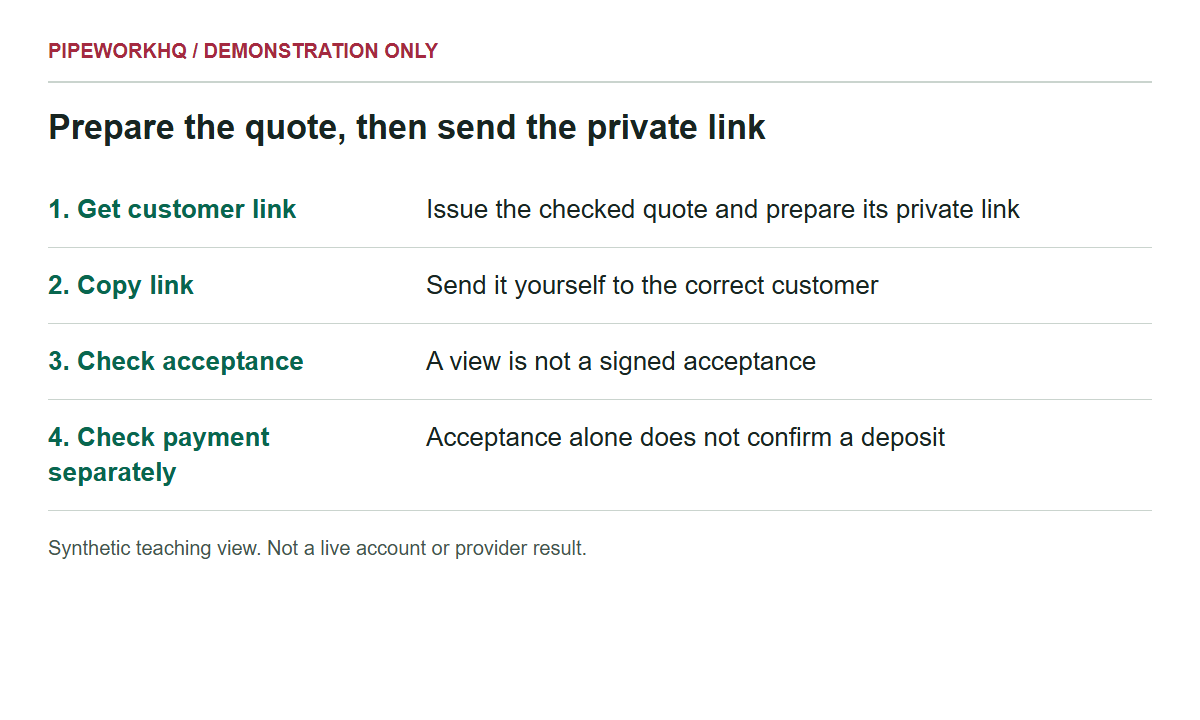
Demonstration only. Figure 10. Made-up example task. Get customer link has not emailed the customer.
Procedure
Prepare the customer link
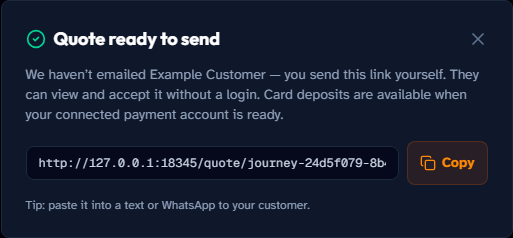
On the Draft select Get customer link. Wait for Quote ready to send. This issues the quote and prepares a private link under /quote/tenantId/quoteId, including the access token. The customer has not been emailed. The list label Sent is therefore not proof of delivery. Always copy the complete generated link; do not construct one by hand.
Share it yourself
Select Copy in the dialog, or Copy link on an issued quote. Paste the full link into your chosen message to the correct customer and actually send that message. Check the recipient before sending. Do not publish the link on your website or social feed.
Explain the customer screen
The customer can open the proposal without creating a PipeworkHQ login. Ask them to check the proposal reference, work, prices and validity. Where options exist, they choose their preferred option. They enter Printed Name and Your Relationship.
Let the customer sign
The customer selects Type name or Draw signature, completes that signature method, reads the agreement and ticks it only if they agree. Confirm & Sign Proposal completes acceptance where offered. Do not sign on the customer's behalf or make legal acceptance for them.
Distinguish deposit checkout
Where card payments and a deposit are available, the customer may see Pay Deposit with the amount and Accept, or Or approve without deposit. They complete any Stripe checks themselves. A cancelled checkout is not a payment, and acceptance without a deposit is not evidence of money received.
Read the checkout status
After checkout, a valid original quote link can show Checking your payment while the saved acceptance is still pending. Wait for the checks and use Check status again when available; do not make another payment to force confirmation. Quote accepted means acceptance is recorded. The separate message "Your deposit payment is confirmed." confirms the recorded deposit; "This does not confirm a payment." means the acceptance screen is not evidence of a paid deposit. This status page shows only the acceptance and deposit result, not the full proposal or controls to sign or pay again.
Check the business record
Return to Quotes and inspect the saved status. Viewed or Engaged is not Accepted. If the customer cannot obtain a current checkout result, inspect the saved quote and payment record before advising them what to do next. An expired or revoked link does not by itself establish whether money was received. Before invoicing, confirm the accepted proposal and option and check payment records separately.
Share the quote yourself
Actual application with made-up example details. The ready-to-send dialog states that no email has been sent. Use Copy and share your own link privately; do not copy the local demonstration address shown here.
Check the result
The intended customer received the complete private link through a message you actually sent.
The quote shows the expected acceptance state.
Any deposit is verified separately and will not be recorded a second time as a manual payment.
Fault finding
Problems and checks for Send a quote link and check acceptance
What you see
What to do
The quote is marked sent but the customer has nothing.
Use Copy link and send it yourself. Get customer link does not email the proposal.
No customer link can be built.
Check the error and saved quote, job and customer in the active business, then retry link preparation only if no usable link was returned. A website or domain purchase is not required. Report the quote reference, never its private access token.
The customer cannot accept or the payment was cancelled.
Check validity, the full link, the selected option, printed name, signature and agreement checkbox. For checkout issues, check payment status before asking them to try again.
Checkout status stays pending, cannot be checked or leaves the retry button unavailable.
Do not ask the customer to pay again. They can use Check status again when available or reopen the full original private quote link. The page removes the token from the address bar, so refreshing or sharing that shortened address may not reopen the status. If the original link has expired or cannot show a result, inspect the saved quote and payment records and contact support if the outcome remains unclear.
Check the device's date, time and time zone, particularly when travelling or using a replacement device.
Check the engineer's existing commitments; a saved appointment is not a guarantee that conflicts have been prevented.
Procedure
Find the job
Open Jobs and select View job on the intended customer and property. Locate Schedule & progress. A job can exist without a scheduled date.
Enter the appointment
In Booked for choose the agreed date and time. Select Save to diary. Wait for the message that the job is scheduled. This saves the date; do not assume it has changed every job status or sent an appointment message.
Check the diary
Open Diary. Choose Day or Week using Diary view. Use Today, Previous day or Previous week, and Next day or Next week to reach the required date. Find the job and check its customer, address and Scheduled time.
Complete allocation and booking
Use Jobs board if an owner or administrator needs to allocate the engineer. On the job use Book this job or Confirm booking when those actions are appropriate and available. A date, an assigned engineer and the job's status are separate pieces of information.
Change an appointment
Open the job again, amend Booked for and select Change time. Return to Diary to check both the new date and the absence of an unintended duplicate. Tell the customer and engineer about the change through your normal communication route.
Clear the unscheduled list
Read Unscheduled for jobs with no date. Use the job's own schedule control to set the date. Do not create another job merely to make an existing one appear in the diary.
Check the result
The intended job appears on the intended date and time.
The job has the right assigned engineer and appropriate booking status.
The customer has been told the appointment or change separately.
Fault finding
Problems and checks for Book a saved job into the diary
What you see
What to do
A job appears under Unscheduled.
Open the job, fill Booked for and save. Check the saved result rather than relying on an unsaved date input.
A job is on the wrong day.
Check device time zone and the saved date/time. Use Change time on the record, then verify in the relevant diary view.
The diary cannot load.
Check the connection and active business, then refresh. Use Jobs to inspect existing records while reporting a persistent diary error.
Use an owner or administrator account to assign or move jobs on this board.
Add the relevant team member before allocating work.
Confirm the job, date and required competence separately. Assignment is not certification or a check of travel time.
Procedure
Open the board
Choose Jobs board in the menu. The page heading is Dispatch. Read the active-job count and any loading error. Completed or otherwise inactive work may not appear; use All jobs when you need the wider record list.
Inspect unassigned work
In Unassigned, identify the job by customer and address. Use View job if more context is needed before making an allocation. Do not allocate solely from a similar customer name.
Choose the engineer
Use Assign to and Choose an engineer... on the relevant card. Select the intended team member and wait while it saves. The board should move the job into that person's group under Who's on what.
Change an allocation
Use the job's assignment selector to choose another engineer. To remove the assignment, use Unassign (move to Unassigned). Check the resulting group and notify the people affected; the board is not proof that they have acknowledged the change.
Deal with departing staff
Look for Former / unknown engineer. Use the selector to reassign those jobs to a current team member. Removing a person from Team is not a substitute for reviewing their unfinished work.
Check the day
Open Diary and the job's Schedule & progress to verify the appointment and status. Allocation on this board does not itself establish a date, route plan or customer booking.
Check the result
The job sits under the intended engineer or deliberately under Unassigned.
No active work has been left with a former team member.
The diary and customer communication agree with the allocation.
Fault finding
Problems and checks for Allocate engineers on the Jobs board
What you see
What to do
The board is view-only.
Only owners and administrators can assign or move jobs here. Ask the responsible person to make the change.
No engineers are offered.
Check Team and pending invitations. A person who has not joined is not an active engineer to allocate.
An assignment fails or does not move.
Read the error, check the engineer still belongs to the business and refresh the board before retrying. Do not create a replacement job.
Open the correct saved job and confirm customer, address and assigned engineer.
Only record events that have actually happened. Available actions depend on role and the current job state.
Get the necessary permission for photographs and keep private documents or unrelated people out of shot.
Procedure
Book and start travelling
In Schedule & progress use Book this job when appropriate. The screen attempts to assign an unassigned job to the current eligible user before booking or day-of work. Check the actual assignee, particularly in a team. Use Confirm booking if required, then On my way only when travelling.
Record arrival and work
Select I'm on site on arrival and Start work when work begins. Wait for each success message and the updated status before the next action. These controls record the job's progress; they are not a technical safety checklist.
Record exceptions honestly
Use No access, Cancel job or Return visit needed only when applicable. Enter the requested reason and confirm using the action's button. Keep going instead closes the reason form. Use Pause and Back to work for the supported pause/resume path. Do not mark a failed visit Job done to clear it from the board.
Finish the job record
Select Job done when the work is genuinely complete. Check the saved status before preparing the invoice, certificate or review-related follow-up. If no actions are available for the current state, do not assume a hidden automatic recovery or reopening action exists.
Take photos from a phone
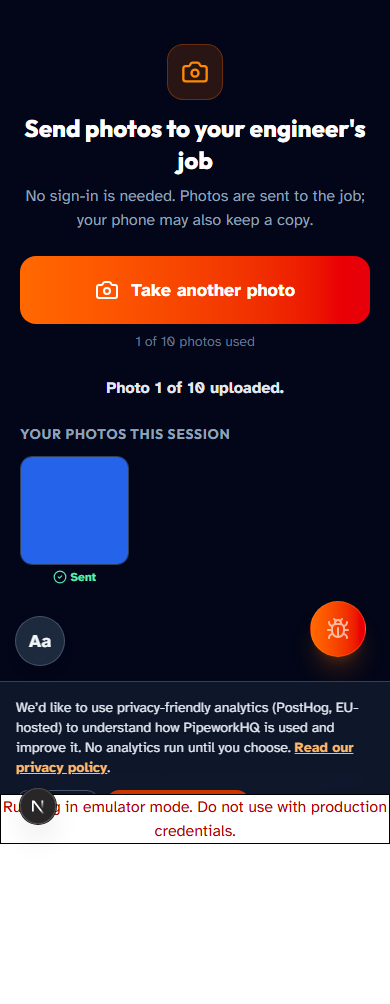
Under Job photos select Snap from phone. Scan the code or send the displayed capture link to your own phone. This limited capture session does not require phone sign-in and lasts ten minutes. Photos are sent to the job; your phone may also keep a copy. Keep the code and any local photo copies private; anyone holding the code may be able to upload to this job during that session.
Check and close capture
Take the required photos and confirm they appear against the intended job. If the phone says Upload status unknown. Check this job on the computer before starting another session, stop and check the saved job photos on the computer first. The upload may already have arrived; this is not an expired-session or retake instruction. For a confirmed ordinary expiry, Generate a new code is available. Select Done — end session when finished. A full Continue elsewhere hand-off is different: it requires the same signed-in user.
Share a photo deliberately
Share to customer opens the device share menu for the latest job photo where supported. Inspect the photo and recipient, then send through the selected app yourself. Opening the share menu does not send anything automatically.
Use a photo in public marketing
Keep ordinary job capture and customer sharing separate from public permission. For genuinely completed work, open Marketing, Review & publish and follow procedure 04: select the exact current capture, classify it for this approval, prepare private copies, inspect them and confirm explicit publication consent. This does not change the original capture record or override an explicit private restriction.
Check a phone photo upload
Actual application with made-up example details. The capture page reports one photo uploaded to the job. The blue block is a made-up example. A phone may also keep a local copy; this is not permission to use the photo in marketing.
Check the result
The saved status reflects the actual visit and any exception has a factual reason.
Photos are visible on the correct job before the capture session is ended.
Customer sharing, certificates and invoicing are handled separately and deliberately.
Fault finding
Problems and checks for Record job progress and collect site photos
What you see
What to do
Book this job or a later action is rejected.
Read the server's prerequisite message. Check assignment, role and current state; the automatic assignment attempt can also fail. Ask an owner or administrator to resolve the allocation.
No actions are available after no access or a return visit.
Keep the reason and job reference, and ask support about the supported next transition. Do not create misleading completion events.
Photos do not appear.
Check the correct job on the computer and the phone's exact status. Upload status unknown is a terminal recovery state: do not retake the same photo or begin another session until the saved job has been checked. A photo may already be stored. If the result remains unclear, keep the job reference and ask support to reconcile it. Generate a fresh code only for a confirmed expiry or after the unknown outcome is resolved.
Photograph a paper diary page, check each saved draft against the original, then confirm the work and appointment before relying on the diary.
Before you start
Have access to the diary-scanning feature, an internet connection and an owner, administrator or engineer role. Only owners and administrators can ignore scanned drafts.
Use a clear, legible page and know which date it represents.
Check existing jobs before scanning to avoid importing the same appointments twice.
Procedure
Set the date
Open Scan paper diary. The page is marked Beta. Under 1. Configure upload, choose the date that the diary page is for. Check the date carefully, especially if the page covers more than one day.
Choose the page
Use Upload paper diary photo and select a clear PNG or JPG image. Although the upload hint mentions PDF, the current file chooser accepts images; do not rely on PDF upload. Use Replace Photo if the image is blurred, rotated or the wrong page.
Run the scan once
Select Run AI Planner Scan and wait while Digitizing handwriting... is shown. The message "Saved draft appointments are ready for review." means the page has loaded the saved jobs returned by the scan. The scan may already have created related customer, property and job records; it is not a temporary text preview. Compare the number of saved appointments with the paper page, because some entries may not have produced a draft.
Check the saved customer and property
Under 2. Review extracted diary, compare every date, time, customer, address and note with the paper diary. Use Open saved job to check the actual job. You cannot rename or change the linked customer or property here. If either is wrong or incomplete, stop before approval and correct the customer or job first.
Edit the saved time and notes
Select Edit appointment details, whose tooltip is Edit details. Check Appointment date, adjust Time if needed and correct Job notes. Changing Time preserves the saved appointment date and duration. Changing Target Schedule Date after a scan does not move those saved appointments; it sets the date for a later scan. Check the actual saved date and time, including the device's local time zone, before proceeding.
Complete missing work details
If Work item and Does this work involve gas? appear, enter the actual work description and choose Yes or No yourself. PipeworkHQ cannot decide that from the diary. The new item has no price, so add and check the charges and VAT on the quote. Choosing Gas work does not prove competence or give permission to carry it out.
Save a draft or assign and book
Choose the intended person under Assigned engineer. Save draft saves the appointment details but does not assign that selected engineer or book the job. To finish, select Save and approve: the system saves the details, assigns the engineer and then requests the booked status. Wait for the message "Appointment booked." and the Approved row status. Approve on a reviewed row opens the editor if a work item or engineer is missing. Cancel closes the editor without saving the current edits.
Ignore a draft without deleting its history
As an owner or administrator, select Ignore this appointment, whose tooltip is Ignore appointment. Read Ignore this appointment? and select Cancel draft only if cancellation is intended. The draft job is cancelled and the row shows Ignored; the customer, property and audit history are retained. This is not deletion. Engineers can review and approve drafts but do not have this cancellation control.
Check the saved job and diary
Use Open saved job, then check Jobs, Diary and Jobs board for the correct customer, property, appointment date, start/end times and assigned engineer. Confirm the saved job is booked, not merely that an edit was saved. Approval uses separate save, assignment and booking requests, so an error may occur after some changes have succeeded. Review the actual record before retrying; do not delete or recreate it to force a status.
Check the result
Each retained appointment matches the paper diary and its saved customer/property record; missing work details have been reviewed.
Each approved job is booked on the correct saved date and time with the intended engineer; ignored drafts are cancelled, not deleted.
No duplicates or unintended draft jobs remain unnoticed after a failed or repeated scan.
Fault finding
Problems and checks for Scan and review a paper diary
What you see
What to do
The scan is inaccurate.
Correct Time and Job notes where appropriate. Use Open saved job to investigate a wrong customer, property or date; those identities are not editable inline. Before trying a clearer image or New job, check what has already been saved to avoid duplicate records.
Scanning fails part way through.
If Reload saved appointments appears, use it to reload the drafts already returned by the scan. Check Jobs, Customers and Diary for records already created before scanning again. An empty result list or failed read is not proof that nothing was saved.
Saving or approval fails, or the appointment has changed since you opened it.
Read the error and inspect the refreshed row and Open saved job. Check whether the details, engineer assignment or booking already succeeded before retrying. If another person changed the customer/property link or job status, review the current record first. A booked job is not changed back to draft by an approval retry. Report the job reference and scan date if the state remains unclear.
Approval is unavailable or asks for more information.
Check your plan and role, finish any open edit, and wait for the current action to finish. Complete Work item and Does this work involve gas? when shown, then choose Assigned engineer before Save and approve. If assignment is refused, correct it in the job or diary; the scanner cannot bypass those checks.
Automatic room scanning is coming soon. Sample layouts are made-up examples. Calculator results are aids for an engineer to check; they are not certificates, grant decisions or automatic submissions.
Before you start
Use your own measured information and the applicable authoritative instructions for the work.
Have the required feature access; advanced calculators, surveys and heat-pump tools may have different access gates.
This manual covers software operation only. It provides no design values, safety thresholds, testing method or regulatory decision.
Procedure
Open the right tool
Use Calculators for the Free toolkit and Advanced calculators. Open the required calculator, check its field labels and units, and review the inputs and result. A result is an aid for the qualified operator, not permission to carry out work or a safety certificate.
Open a job survey
From the job select Heat loss survey, or from a quote use Open Survey where shown. In Whole-House Survey & MCS Estimator select the intended floor and room, enter measured room details and check units. Keep assumptions distinguishable from measured facts in your own job records.
Avoid sample data in real records
Sample Layout Loader, Sketch, Video and LiDAR demonstration controls load example layouts. The confirmation warns that a sample layout replaces the current floors. Do not use sample dimensions for a customer survey or treat the display as a scan of their property.
Save and re-open
Select Save Survey and wait for Survey saved successfully. Re-open the survey from the same job to check it. Add to Quote creates a draft from the estimated items. Check the quantities, prices, VAT and work description before sharing it.
Read cylinder sizing as an estimate
In the DHW tool, complete the actual household inputs and select Size the cylinder. Check Indicative cylinder volume and the warning. Coil selection says Manufacturer selection required: no minimum coil area is calculated from household size. Use the manufacturer's tested data and qualified design process for the real selection; a missing coil area is intentional, not zero.
Enter each gas-pipe section accurately
In Gas pipe sizing enter the length, pipe diameter, equivalent fitting length and gross gas input carried by that section. Do not enter the appliance's useful output. Include the fittings, using zero only when that is correct. Select Check pressure drop. The result compares the full calculation with an indicative 1.0 mbar design target; a rounded display that looks equal is not approval of the design.
Generate from the saved survey
Save and reopen the measured survey before selecting Generate heat-loss summary. The server uses the authoritative saved rooms and external design temperature, not unsaved browser values. Read the returned room details and assumptions, then Open printable summary. If the survey changes, save it and generate again. The printout is indicative: it does not select a heat-pump model, buffer volume or definitive MCS design.
Keep a potential BUS amount separate
Complete only eligibility answers you can confirm and run the displayed check. Needs confirmation means information is still missing; a potential amount is not an agreed grant or approval. Even Checklist met remains subject to Ofgem approval. Do not promise or deduct a potential amount as a confirmed award. The responsible installer checks evidence and records the confirmed upfront deduction on the quote and invoice separately; the app does not submit the application.
Use boiler reference tools cautiously
On the job open Boiler tools. Look up code and Run troubleshooter return reference information or indicative suggestions. Check them against the manufacturer's current documentation and your actual appliance. Do not treat a result labelled Verified data as a completed site test.
Record a real warranty confirmation
Complete any registration in the manufacturer's own portal first. In Record warranty enter the signed Benchmark log ID and the manufacturer's real confirmation reference, then select Record registration. PipeworkHQ records that reference; it does not submit the registration to the manufacturer.
Treat submission help as preparation
Where Submission Assistant is available, use its prepared job details and official-portal links only as an administrative aid. The responsible person submits in the external portal and checks current requirements there. Copy all does not submit an application.
Check the result
The saved survey belongs to the correct job and contains no unintended sample rooms.
Any generated quote has been separately checked before issue.
Warranty or submission references come from actual external confirmations, not from a demo or a calculated result.
Every gas section uses gross input and explicit fittings lengths. Cylinder coil area and heat-pump product selection have not been invented.
The printable summary matches the saved survey and returned design rooms; no unsaved changes or potential BUS grant have been presented as approved.
Fault finding
Problems and checks for Use surveys and reference tools as records
What you see
What to do
A result looks implausible or a safety badge is displayed.
Stop relying on that result and check the inputs and authoritative procedure. Do not use the badge as sign-off.
A tool is locked.
Read its access message and ask the owner to check the plan. Do not change job data to try to bypass the gate.
A warranty confirmation cannot be recorded.
Check the actual signed Benchmark log ID and real manufacturer reference. Complete the manufacturer process first; do not invent a reference.
The printout does not match changes still on screen.
Save the survey, reopen it to verify the saved rooms and external temperature, then Generate heat-loss summary again. Do not edit an old printout to pretend the server calculated unsaved inputs.
Available record types and signing depend on entitlement, role and prerequisites. Template Governance display and certificate badges do not establish independent approval of the underlying work.
Before you start
Have a checked job, customer and property, and the correct role and certificate entitlement.
Use only records and observations from work you are competent and authorised to undertake.
This is not an inspection, testing, certification or legal procedure. Follow the authoritative requirements for the work outside this manual.
Procedure
Start the right record
Open Certificates, headed Compliance & Handover Packs. Select New CP12 Certificate. The creation dialog includes Target Job and Record Type; choose the actual record type required rather than assuming the launch button limits every record to CP12.
Enter actual recorded information
Check Target Job, Record Type and Work Order / PO Ref. Complete the applicable form from your own verified job records. Where applicable use Add Appliance Row and remove accidental rows. Do not retain example values or default outcomes without checking them.
Use an analyser without Bluetooth
You do not need Bluetooth to enter a record on your iPhone. Read the results from your analyser and enter them in the matching fields for the correct appliance. Check the units, decimal points and each value against the analyser or its printout before saving. PipeworkHQ does not transfer these readings automatically. Do not use a guessed value or treat a photograph as a checked reading.
Save and inspect the draft
Select Save Draft Record. In Gas Safety Records find the record by customer, address or reference and open it. Check the customer and property snapshots, included appliances and all entries before proceeding. A Draft is not a signed document.
Sign only when ready
Select Sign & Lock Record to open Sign safety record. Under Signature method choose Type full name or Draw signature. Enter Full name for signature or draw it; Clear removes a drawing. Review the record and explicitly tick the statement confirming checked readings, safety findings, current qualifications and responsibility. This confirmation starts unchecked each time. Select Sign & Lock Record only when you can personally make that declaration. The signature and account identity are recorded and signing locks the record.
Download the signed record
Wait for Certificate signed and locked and the PDF-ready message. Select Download PDF and check the actual PDF for identity, reference, address and completeness. Keep the verified result in your normal document-handling process.
Handle an error after signing
A signed record is not a freely editable draft. If the record needs invalidating, use Void Certificate only when appropriate, provide Reason for voiding and confirm deliberately. The voided record remains for audit. Follow the proper replacement process for your work; do not treat voiding as deletion.
Keep external submissions separate
Regulatory Lodgement may show Manual Action Required. Complete the external process yourself, then enter the real Lodgement Reference and select Save Lodgement Reference. A saved reference is not proof that PipeworkHQ performed a submission.
Distinguish water-temperature logs from risk assessment
Where a water-temperature control record is used, record the actual premises type, outlet type, measured temperature and elapsed time. The source evaluates a timed healthcare hot-water target of 55 degrees C; this is a software control description, not a complete test method. Mixed or shower outlet readings do not prove hot and cold distribution control. A temperature log does not assess the overall Legionella risk: a qualified risk assessment and any required corrective work remain separate.
Check the result
The correct type of record is linked to the right job and property.
The signed PDF has been opened and checked, not merely requested.
Any required external notification has its own genuine confirmation.
Fault finding
Problems and checks for Create, sign and retrieve certificate records
What you see
What to do
The form says Please select a Job.
Choose the actual saved job. If it is missing, check Jobs and the active business first.
Signing is blocked or no signature is accepted.
Check the required role and qualifications, then provide a typed full name or drawing and explicitly confirm the fresh engineer declaration. A previous signature or saved certificate does not pre-tick it. Never sign for another engineer or substitute invented readings.
The PDF is not ready or a blank tab opens.
Wait and retry Download PDF from the record. Check browser popup handling and connection; report the record reference if the failure persists.
Have at least one signed certificate for the intended job.
Have the correct recipient names and email addresses, including any landlord, occupant or managing agent who should receive the pack.
Check document access and authority before distributing customer information.
Procedure
Start assembly
In Certificates choose Assemble Handover Pack, or Assemble First Pack in Handover Packs. Select Target Job. Confirm the customer and site rather than relying on a similar job title.
Choose the documents
Under Signed Safety Records select the intended signed certificates. Draft records cannot substitute for signed ones. Include Linked Invoices only if they belong in this pack; check their references and amounts before selecting them.
Choose recipients individually
Under Delivery Route & Contacts use Add Recipient as needed. Set Type, Name and Email for each recipient. Landlord, Occupant / Tenant and Managing Agent are distinct choices; a recipient listed on a job is not automatically the right recipient for every document.
Check the cover material
Read Cover Letter / Note and the Automatically bundle UK Gas Safety Advice leaflets option. Make the contents appropriate to this handover without editing or inventing technical guidance in this manual.
Assemble and inspect
Select Assemble Pack. Open the pack and check Linked Records, Linked Invoices and Routing Recipients. Select Download handover PDF and inspect the resulting file before sending it externally.
Dispatch deliberately
Select Dispatch Handover Pack when the records and recipients are correct. Wait for the outcome. Assembly and downloading are not dispatch, and a dispatch request is not proof that every recipient has read or received it.
Use other sharing routes with care
If Share via WhatsApp is offered on a record, check the document and recipient in the opened sharing route before sending. Manual sharing is separate from dispatching the assembled pack.
Check the result
The pack contains only the intended signed records and optional invoices.
Each recipient's name, type and email have been checked.
You have inspected the actual pack PDF and recorded any delivery failure for follow-up.
Fault finding
Problems and checks for Assemble and dispatch a handover pack
What you see
What to do
No signed certificates are found.
Open the intended certificate for that job and complete the normal signing steps first. Do not choose an unrelated signed record.
The assembled PDF is not ready.
Wait and retry Download handover PDF. Do not send a blank or unverified file.
A recipient has not received the pack.
Check the email address and dispatch outcome before resending. A saved pack or a click on Dispatch is not delivery evidence; use support for persistent failures.
The quote-based form uses the recorded accepted option and linked job. Missing acceptance details prevent draft creation. Issue Invoice is not proof of email delivery or money received.
Before you start
Have the correct saved job and, where used, an accepted quote.
Check business identity, VAT treatment, amounts and any deposit or earlier invoice before billing.
Decide whether you are invoicing accepted quoted work or manually entered work; do not invoice the same supply twice.
Procedure
Check for an existing invoice
Open Invoices, headed Invoices & Accounting. Search by customer name or invoice number and inspect the status. Open any existing invoice for the job before selecting New Invoice.
Select the source and job
Select New Invoice. In Create Draft Invoice use Link Accepted Quote (Optional) for the accepted proposal, or Create Manual Invoicing for manual lines. A selected accepted quote supplies its linked job, and Associated Job (Required) is then fixed to that job. For a manual invoice, choose the correct job yourself.
Check the accepted option
The quote-based form uses the option recorded as accepted on the quote. Check that option's work, quantities and amount against the customer's acceptance before issuing the invoice. If there is no confirmed option or linked job, creation is refused. Open the quote to check its acceptance; do not choose a substitute job or option to get past the error.
Enter manual lines where needed
For manual invoicing use Add Item Row, Description, Qty, Price (£) and the VAT selector. Review Total Calculations Preview. Do not use estimated parts or a tax default without checking the underlying work and accounts treatment.
Save and inspect the draft
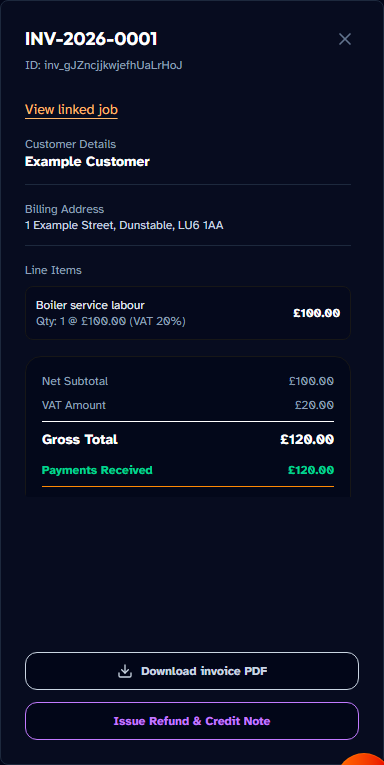
Select Save Invoice Draft. Open the Draft and read Customer Details, Billing Address, Line Items, Net Subtotal, VAT Amount, Gross Total and Outstanding Balance. The current detail drawer does not provide a general line-edit form; correct a bad draft before issue.
Issue the invoice
Select Issue Invoice only after checking the draft. Wait for the issued status and invoice number. Use History Timeline to check recorded actions. Issue is distinct from receiving payment; do not mark money received simply because an invoice has a number.
Retrieve or cancel appropriately
Select Download invoice PDF when offered and inspect the actual file. Use Cancel Draft for an unissued draft that should not proceed, enter Reason for cancelling and select Cancel invoice. Issued-document corrections use the appropriate credit/refund process, not draft cancellation.
Check the result
The issued invoice has the right customer, property, accepted scope and invoice number.
The saved VAT and totals match the checked billing decision.
The PDF opens correctly and any balance is supported by payment records.
Fault finding
Problems and checks for Create, issue and download an invoice
What you see
What to do
An accepted quote is unavailable.
Check that the quote is actually Accepted, belongs to the current business and has not already been invoiced as intended. Do not select a merely viewed quote.
The draft has the wrong job, lines or option.
Do not issue it. Check the accepted proposal and linked job; the quote-based job cannot be changed independently in this form. Use Cancel Draft where appropriate and prepare the correct draft, or ask support about incorrect acceptance details.
Download invoice PDF opens nothing.
Check popup permission and connection, then retry from the saved invoice. A successful issue does not by itself prove PDF retrieval worked.
Open and check the issued invoice and its outstanding balance.
For online card collection, have the required plan and an active Stripe Connect setup.
Only record money actually received or repaid. This is software operation, not financial or tax advice.
Procedure
Request a card payment
Open the invoice and select Request card payment online. Copy the Customer card-payment link and send it privately to the correct customer. They pay on Stripe. Creating or copying the link does not collect money.
Wait for confirmed card payment
After the customer finishes checkout, reopen the invoice and check the Stripe payment. Returning from checkout does not prove the payment completed. Do not also record the same card payment by hand. The customer's payment and Stripe's later payout to your bank are separate events.
Record an external receipt
For a real BACS, cash or cheque receipt select Record a manual payment. Enter Payment Amount (£), choose Bank Transfer (BACS), Cash or Cheque, and add Reference / Note if useful. Check against the displayed maximum outstanding amount, then select Record Payment.
Check the remaining balance
Reopen the invoice and read Paid Balance and Outstanding Balance. A part payment leaves a balance and a partially paid state. Match it to the actual receipt once. If recording was accepted but refresh failed, check the saved invoice before doing anything else. Recording BACS here does not move money from a bank.
Prepare a refund carefully
Use Issue Refund & Credit Note only for the intended adjustment. Choose Payment to refund, enter Refund Amount (£) and Reason for Credit Note / Refund. Check the remaining refundable amount for that specific payment, not just the invoice total.
Handle the original payment method
Stripe payments are refunded through Stripe. For another method, repay the customer outside PipeworkHQ first, enter Receipt / transaction reference and tick I confirm the customer has already been repaid outside PipeworkHQ only when true. Select Confirm Refund after checking all details.
Distinguish pending from completed repayment
After Confirm refund, check the original payment, refunded amount, invoice history and credit note. Stripe accepted but not completed means the refund is still pending. Wait for Stripe and the invoice to show it completed. A credit note records the accounts change; it does not prove the money reached the customer. Keep the Stripe refund reference.
Resolve an unknown response without a duplicate
If a payment or refund times out or leaves an uncertain balance, stop and check the invoice and Stripe first. Do not submit it again, change the amount, clear browser data or switch device to get around a Pending result. Keep the invoice reference and ask the owner or support to check the first attempt before any new money action.
Check the recorded invoice payment
Actual application with made-up example details. The example invoice shows a gross total of GBP 120 and payments received of GBP 120 after a recorded BACS receipt. This screenshot does not prove a live bank transfer or Stripe settlement.
Check the result
Every recorded receipt corresponds to actual money received exactly once.
The invoice balance agrees with the checked receipt records.
A completed refund has a Stripe refund reference or other repayment evidence; Pending is not treated as complete.
Card acceptance, completed payment, bank payout, completed refund and credit note have been checked as separate facts.
Fault finding
Problems and checks for Request payment, record money received and refund
What you see
What to do
No card-payment link is returned.
Check Stripe Connect status and entitlement under Settings, Payments. Do not send an empty or old link as a substitute.
The customer reports paying but the balance is unchanged.
Check the payment in Stripe and allow time for its result to appear. Do not immediately request payment again or record a duplicate payment by hand. Report the invoice reference if you need support.
A refund is pending, unknown, failed or no refundable amount remains.
Check the specific original payment and prior refunds. Pending or unknown may already have reached Stripe: do not resubmit. A definite failure still needs reconciliation before a new request. For an external method, never tick repayment complete before the customer has actually been repaid.
Live card payments need a supported plan and completed Stripe setup, with both charges and payouts enabled. Check one authorised payment and payout before relying on the service.
Before you start
Use the business owner's account; the screen restricts starting or resuming Stripe onboarding to the owner.
Have the business details, requested identity evidence and intended payout bank details available for Stripe.
Check the plan and make sure the screen says Live. A test setup cannot take real customer money.
Procedure
Open Payments
In Settings choose Payments. Read Card Payments (Stripe Connect) and the current state. PipeworkHQ subscription billing is a separate function: paying for your plan does not itself complete your customer-payment setup.
Start Stripe setup
Select Connect with Stripe. Wait for the Stripe page and check that the address belongs to Stripe. The account owner enters business details, identity checks and bank information there. Do not send identity documents, bank details or passwords in a support message.
Complete outstanding requirements
If the page says Stripe onboarding in progress, use Resume Stripe Onboarding. Provide any further details requested by Stripe. Starting onboarding or having an account reference is not the same as charges and payouts being ready.
Return and inspect status
Return to Settings, Payments and check the displayed state. When active, Integration Details shows Charges Enabled and Payouts Enabled. If either requirement remains incomplete, resolve it in Stripe rather than telling customers that collection is ready.
Open Stripe
Use View Stripe Express Dashboard where available to inspect the account. Check actual processing fees, payment methods and payout information there. Do not rely on approximate fee examples in application copy as a current tariff or promise of a particular payout date.
Separate payment from payout
After a real customer payment, follow procedure 19 to check its payment record and invoice balance. Then check Stripe's payout status and the actual credit in the business bank separately. Charges Enabled, Payouts Enabled and an accepted refund request are setup or processing states, not proof that a particular transfer has completed. Never repeat a pending or unknown financial request to force a status change.
Check a business-identity change
After a legal-identity change in PipeworkHQ, review Stripe's legal and payout details separately. The app warns that it does not update them automatically. Keep billing subscription changes separate from this verification.
Check the result
The setup belongs to the intended business and environment.
The required charge and payout states are confirmed, not merely onboarding started.
A customer invoice payment can be matched to the payment shown in Stripe.
Fault finding
Problems and checks for Connect the business for card payments
What you see
What to do
Connect with Stripe is unavailable to you.
Ask the business owner to perform onboarding. Do not use or share the owner's login.
Onboarding returns but payments remain inactive.
Use Resume Stripe setup and complete the steps Stripe still asks for. Allow the status to refresh, then report a continuing mismatch using the account or invoice reference, never a password.
You see Stripe test tools.
Do not use mock customers or simulated transactions as evidence of live readiness. Confirm which environment you are operating before sending a real customer a payment request.
Pricing, limits and promotion eligibility must be checked in the actual billing flow. Open Banking pay-by-bank, direct accounting connections and automatic posting are unavailable. Existing-domain notes do not verify custom-domain routing.
Before you start
Use the owner or other authorised billing operator and understand the effect of changing plan.
Check whether you are changing PipeworkHQ's subscription or your separate Stripe customer-payment connection.
Have any genuine reserved promotion details to hand without sharing private invitation links.
Procedure
Read the current plan
Open Billing & Subscription. Check Current plan and the features or limits shown. Use the current checkout price rather than an older price quoted elsewhere. Paying for a plan does not make a Coming soon feature available.
Choose the billing period
Select Monthly billing or Annual billing. Read the displayed total and period carefully; a monthly equivalent is not necessarily the amount charged today. Confirm the intended plan before proceeding.
Set engineer capacity
For plans with Extra engineers, use the labelled increase/decrease controls or number input. Check the included engineer count, additional charge and total. If the screen says the self-service maximum has been reached, contact support instead of trying to work around the cap.
Apply a reserved promotion
If Promotion code is ready for checkout appears, choose the assigned plan and billing period named by that message. At checkout inspect the actual discount, duration and amount due. A typed code or a verification email alone is not confirmation that the discount was applied.
Change or start a subscription
Select Subscribe now or the available plan-change button. Read the Stripe checkout and price before agreeing to pay. After returning, check Current plan and feature access. Do not click repeatedly if Stripe is slow.
Move down or cancel
Downgrade to Free may direct you to cancel the active subscription through the Stripe customer portal or contact support. The reviewed screen does not expose a general billing-portal launch button. Follow the available account route or ask support; do not assume a rejected downgrade has cancelled billing.
Handle referrals separately
Where the referral panel is shown, Copy code or Copy share message provides the referral information and Read the plain-English terms opens its terms. Referral credit is reviewed and applied by the team under those terms, not an instant checkout voucher.
Check the result
The confirmed plan, period and engineer capacity are the ones intended.
The final checkout shows the expected promotion before payment is authorised.
A cancellation or change has a confirmation; merely selecting another card on the page is not treated as completion.
Fault finding
Problems and checks for Manage the subscription, extra engineers and vouchers
What you see
What to do
A voucher is not applied.
Check email verification, the promotion's assigned plan and period, and the checkout total. Stop before paying if it differs and contact support with the non-secret promotion description.
A paid feature is still locked.
Check Current plan, the active business and any Coming soon label. Refresh after a confirmed change and report the account reference if the plan still looks wrong.
There are not enough seats for an invitation.
Check Extra engineers and current team membership with the owner. Buying capacity and inviting a person are separate actions.
This is a scan, review and approval screen. No supplier payment, stock control or verified automatic accounting posting is claimed.
Before you start
Have access to supplier-bill scanning and a clear photograph of the original bill.
Keep the original receipt or invoice available for comparison and your records.
Check that the bill has not already been scanned; scanning is not a supplier payment.
Procedure
Open Receipts
Choose Receipts in the menu. The page heading is Supplier Bills. Read Your scanned bills before adding another copy of a merchant invoice.
Choose a clear image
Under Scan a supplier bill select Upload bill photo. Use PNG or JPG within the stated 7 MB limit. Include the supplier, invoice reference and totals, with edges and text legible. Use Choose a different photo if the preview is incomplete.
Run extraction
Select Scan bill and wait while the bill is read. The result should appear as a draft needing review. An extraction message does not establish that the supplier, amounts or VAT are correct.
Compare the details
Read the supplier details and extracted lines. Compare Description, Qty, Unit, VAT and Net with the original, then check Net, VAT and Gross totals. Look particularly for decimal-point errors, quantity mistakes, missing discounts and duplicated lines.
Approve only a correct draft
Select Approve bill after the comparison is complete. Wait for Supplier bill approved and check the resulting status. Do not approve a wrong draft to remove it from the review list.
Keep accounting separate
Retain the source document and pass the checked record through your normal accounts process. This screen does not prove supplier payment, automatic bookkeeping posting or eligibility to reclaim any tax.
Check the result
The approved record matches the original supplier bill and reference.
Each line and all totals have been checked by a person.
The bill has not been counted twice or mistaken for a customer invoice.
Fault finding
Problems and checks for Scan and approve a supplier bill
What you see
What to do
The image is too large or cannot be read.
Use a smaller, clearer image with good lighting and all totals visible. A lower-resolution scan is preferable to an unreadable compressed image.
The extracted figures are wrong.
Do not approve it. This screen does not let you edit or delete every line after reading a receipt. Keep the original and ask support how to correct the draft.
A repeat scan may have created another bill.
Inspect Your scanned bills and references before approving either record. Report duplicate drafts rather than assuming the app merged them.
Quote and invoice selection from saved parts is a future update. The catalogue is not inventory management, procurement or live merchant pricing.
Before you start
Have checked selling prices and the VAT treatment appropriate to the business.
Search the catalogue before adding a duplicate item.
The current Price list manages the catalogue only; quote and invoice pickers are a future update.
Procedure
Find an existing entry
Open Price list, headed Saved Parts & Price List. Use Search your price list by name, SKU or category. Check whether a labour rate or part already exists under a slightly different description.
Add an item
Select Add part or Add your first part. Enter Name and Unit price (£). The price is before VAT. Add Description and SKU / code if useful, and choose the appropriate Category and VAT rate.
Check units in the name
Use a description that makes the unit clear, such as a length, pack or hourly charge, so the price is not mistaken for a different quantity. The catalogue is a record of your pricing, not a live merchant price feed.
Save and verify
Select Add part and check the row's Name, Category, SKU, Unit price and VAT. For an existing item select Edit, make the intended change and select Save changes.
Remove an obsolete entry carefully
Select Delete only for the intended catalogue row. Read the confirmation and choose Delete part if appropriate. Removing it affects the price list, not quotes or invoices already created.
Use the information in current paperwork
Refer to the saved price while entering a quote or manual invoice. Enter and check the line yourself. Do not expect a catalogue edit to update an existing draft or previously issued document.
Check the result
The item name and description make the priced unit clear.
The price is non-negative and entered before VAT.
Existing documents have not been assumed to change when a catalogue entry is edited or deleted.
Fault finding
Problems and checks for Maintain saved parts and rates
What you see
What to do
The part will not save.
Enter a name and a valid non-negative price in pounds. Check your permission and the error if saving still fails.
The item is missing from a quote picker.
Automatic selection from this catalogue is not yet implemented. Enter the checked line manually.
An old invoice shows an older price.
That invoice is a historical record, not a live view of the catalogue. Use the appropriate document-correction process rather than editing the part.
Use an owner or administrator account to invite members; this page allows only an owner to remove another member.
Know the person's exact email address and the access they need.
Check available engineer capacity in Billing & Subscription before inviting paid engineer seats.
Procedure
Review the team
Open Team Management. Read Members and Pending Invitations. Do not create a second invitation for someone who already has a usable pending one. Owner, admin, engineer, apprentice and accountant roles have different access; accountant is described as read-only financial access.
Create the invitation
Select Invite Teammate, enter Email address and choose Role. Use the least access needed for the person's duties. Select Create Invite Link and wait for Invite link (one-time). Creating the link is not the same as sending an email invitation.
Share the link privately
Send the one-time link to the intended person through a trusted channel. The screen says it expires in seven days and must be accepted with the invited email. Do not post it in a public channel or give another person your login.
Accept using the invited address
The recipient opens the link and chooses Create account & join or Sign in & join as appropriate. Email address must match the invitation. If already signed in as someone else, use Use a different account. Check that the person appears in Members after joining.
Maintain individual credentials
Use Credentials on the appropriate member. Enter the relevant licence or certificate numbers and expiry dates from actual evidence, then select Save credentials. These are competence records for your review; PipeworkHQ does not certify the person or replace your checks.
Cancel an unused invitation
Use Cancel invitation on the correct pending entry. An expired or cancelled invitation needs a fresh link; do not ask the person to register an unrelated business as a workaround.
Offboard carefully
As an owner, review outstanding jobs before selecting Remove member on the intended person. Select Confirm only when removal is intended, or Cancel to keep the member. Wait for Team member removed. If an error appears after the row disappears, follow the removal-cleanup troubleshooting below; a missing row alone does not confirm that cleanup finished. Afterwards check Jobs board for Former / unknown engineer work and reassign it. Review billing capacity separately; removing a member should not be assumed to reduce the subscription automatically.
Check the result
The new person appears once with the intended role and business.
The invitation was accepted by the intended email account.
Departing staff no longer have membership and unfinished work has a current owner.
Fault finding
Problems and checks for Invite teammates and manage access
What you see
What to do
The recipient sees a different invited email.
Use the correct account or ask the owner to cancel and recreate the invitation for the correct address. Do not share passwords.
The invitation is incomplete, expired or already used.
Ask the inviting owner or administrator for a fresh link after checking membership.
Inviting or removing is unavailable.
Check the signed-in role and capacity. Owners and administrators can invite teammates, but this page shows Remove member only to an owner and not on their own row. Do not attempt to bypass role restrictions.
A removal reports an error after the member has disappeared from Members.
As the owner, select Retry member removal cleanup above Members to retry the pending removal for the same person. Finish this before starting another team action or leaving the page. Wait for the success message before proceeding; the retry control clears on success. If the error persists or the retry control is no longer available, contact support with the business and member reference and the error text, without credentials. Do not reinvite the person simply to make their row reappear.
Text messaging needs the platform messaging service to be working. Saved settings do not prove delivery. Phone forwarding needs the owner's permission and a checked destination. Email forwarding, mailbox import and incoming WhatsApp messages are not available. Message drafts last only while this page stays open.
Before you start
Have a saved customer with a usable phone number for SMS or email address for email.
Check contact preferences and whether the proposed message is appropriate for that customer.
Set a working business reply email and the intended SMS branding before relying on customer replies.
Demonstration only. Figure 25. Made-up status guide. These are different stages, not a promise of delivery.
Procedure
Choose the customer
Open Messages. In Search customers, enter a name, email address or phone number, then select the correct customer. Check the name and contact details above the conversation. This screen uses the first listed email address and phone number from the saved customer record; correct those in Customers before sending if necessary. On a phone, the customer list sits above the conversation, so scroll down after selecting the customer.
Choose the channel and job
Select SMS or Email. For Email, fill in Email subject, shown with the Subject Line... prompt. Under Link Job:, use the Link job dropdown to choose a job for this customer. Only jobs linked to the selected customer are listed. Leave -- No Link -- selected if no job should be attached. If the required job is missing, check its customer association in Jobs before returning to the message.
Compose and send
Enter the message in Message text and read it back, checking the customer, channel, subject and linked job. Select Send message, the paper-plane button beside the text box with that tooltip and screen-reader name. It is disabled when the message is empty or a request is in progress; its screen-reader name changes to Sending message during submission. Wait for the result before taking another action.
Check what happened
After sending, find the message and read its status. Queued means waiting. Sent means the text-message service accepted it, not that it arrived. Delivered means the phone network reported delivery, but does not prove the customer read or agreed to it. Read any Failed or Unknown notice before trying again.
Keep drafts with the correct customer
When you select another customer, the page keeps the current customer's unsent message, subject, linked job and channel. Select that customer again to restore their draft. These drafts are held only while this Messages page remains open; do not rely on them surviving a refresh, navigation away, sign-out or another device. Customer selection is unavailable while sending. After a send error, the draft remains in the composer: read the error and check the conversation before deciding whether to retry.
Set SMS branding
In Settings open Messaging & SMS. Enter Business name (required) and, if wanted, Phone number for customer calls. Check How your text will appear and select Save messaging settings. The callback number is yours; outgoing texts use the platform's shared UK number.
Handle replies and opt-outs
Supported inbound SMS replies use the platform's shared number and appear in Messages only when they can be matched to one recent customer conversation in this business. Unknown or ambiguous replies need operator review and are not guessed from the most recent message. In Messaging & SMS the owner can choose Messages only, or Messages plus forwarding to their confirmed phone with explicit consent. Email forwarding is not supported. STOP replies apply across the shared number; never use another route to evade an opt-out.
Check the result
The message is linked to the correct customer and, if used, the correct job.
Delivery has been checked separately from submission.
SMS branding is correct. Any phone forwarding is deliberate and consented; unmatched replies are not assumed lost or routed to another business.
Fault finding
Problems and checks for Send customer messages and configure SMS
What you see
What to do
An error appears, or no new message is visible after sending.
Read the error beneath the composer. A failed request leaves the draft in place, but an uncertain response is not proof that nothing was queued. Check the correct customer's conversation and your connection before retrying. Do not repeatedly select Send message; you could submit the same message again.
A message remains Queued or shows Failed.
Check the customer's contact details, channel setup and any opt-out. Use a separate appropriate contact method for urgent arrangements, then report the non-secret record reference.
You expected Gmail, Outlook or WhatsApp conversations to appear.
This screen is not a synchronised personal mailbox or a promise of WhatsApp ingestion. Check replies in the configured destination and your actual email inbox.
An expected SMS reply is missing.
Check the original customer number. Replies to the shared sending number are held when PipeworkHQ cannot safely match them to one business and customer. Contact support with the message reference, never a password. Do not guess who owns the reply.
No domain purchase, mailbox hosting, mailbox import or five-mailbox unified inbox is supplied. Saving settings sends no test email and does not verify delivery.
Before you start
Choose an existing email address you control and can read. It may be one of several addresses you already use.
An owner or administrator of the active business changes these settings. Signing in is separate from changing the public contact address.
Have the SMTP details from your email company only if you intend to send through that mailbox. Never include passwords in notes, screenshots or support messages.
Demonstration only. Figure 26. Teaching diagram with an invented address. No mailbox is connected or tested in this figure.
Procedure
Separate the four names
A website is the pages customers visit. A domain is the name after www. or @, such as example.com. An email address, such as work@example.com, is where customers write. A mailbox is where you sign in to read and reply. Buying a domain does not create a mailbox, and saving either one in PipeworkHQ does not buy or connect it.
Choose one main customer address
Open Settings > Your business online, also reached from Connections or /dashboard/domains. In Main customer email address enter the address customers should see and reply to. Choose the mailbox you check most reliably. This updates the public and reply address, not your PipeworkHQ sign-in. Your other four addresses keep working where they are now.
Decide where to read replies
Choose Where do you read this mailbox? Google and Microsoft open the sign-in page for your existing mailbox. Other leaves you with the same mailbox you already use. Opening the link does not connect the account or bring messages into PipeworkHQ. Read and reply in that mailbox. PipeworkHQ does not combine your five inboxes.
Choose PipeworkHQ sending
Select Send using PipeworkHQ to send from the PipeworkHQ notification address with your business name. Replies go to your main customer email. Save this choice. If the sending service is unavailable, the message fails rather than quietly using a different address.
Or use your existing mailbox for sending
Select Send through my existing mailbox only if your email company gives you an SMTP server name, port, username and app password. Enter those exact details. The username is the sending address and replies go to your chosen main address. Use port 465 with TLS or 587 with STARTTLS. This form cannot connect a mailbox that allows sign-in only through Google or Microsoft. Use Show password only on a private screen. Leave the password blank to keep the one already saved.
Keep the existing domain safe
Domain you already own (optional) is a note, not domain verification or provisioning. Keep the registrar and mailbox subscription where they are. Do not change nameservers or MX mail records from this screen. PipeworkHQ does not buy a domain, create mailboxes or publish guessed DNS values.
Save, then test deliberately
Select Save business online settings and read the result. Settings saved. No email was sent means exactly that. Check the saved address and method again. Before relying on delivery, the owner must authorise a message to an address they control, inspect receipt and reply there, and check the recorded sending outcome. This manual does not perform that test. Get customer link still needs you to send the quote link yourself.
Choose one main customer email
Actual application with made-up example details. The chosen address and Google / Gmail mailbox choice are saved example settings. The address is where customers write; the existing mailbox is where the business reads and replies.
Check the result
The main customer address is the mailbox you intend to monitor; sign-in details have not been changed.
The saved sending method is deliberate. No saved setting has been mistaken for delivery or mailbox import.
The owner checks any authorised test at both ends before relying on it. Existing domain and mailbox services remain unchanged.
Fault finding
Problems and checks for Your business online: choose email and reply safely
What you see
What to do
You have five addresses and do not know which to choose.
Open each mailbox where you normally read it and choose the one you will check reliably for customers. Save that as the main address. Keep the others unchanged; PipeworkHQ does not combine inboxes.
Replies do not appear in Messages.
Open the mailbox for the saved main customer email address. Normal replies go there. PipeworkHQ does not read or import that inbox.
Sending settings are present but delivery is not verified.
Saved means the details were stored. Send a test to an address you control and check the receiving inbox. Sent means the email service accepted the message, not that it arrived. Check before trying again so you do not send duplicates.
A previous sending method is not supported, or saving fails.
The password already saved is kept. Read the error and have the owner choose a supported sending method. A failed save is not success. Do not paste passwords into support or assume the app quietly fixed the connection.
Public publication requires an eligible paid plan. A PipeworkHQ-hosted /e/ address is distinct from a verified custom domain.
Before you start
Have the business name, logo and intended public contact details ready.
Check whether your plan includes public website publication.
Decide whether your full business address should be public, particularly for a home-based business.
Use an owner or administrator to publish or remove work. Obtain actual customer permission before making work public.
Demonstration only. Figure 27. Teaching diagram. A completed job or customer-visible photo is not permission to publish it.
Procedure
Check the current publication state
Open Your website and check the publication status. Publishing needs an active business and a plan that includes a website. Free-plan addresses stay unpublished and new website addresses are not offered on the Free plan. You can still share private quote links.
Choose the hosted address
On an eligible plan, enter the hosted address name after /e/ using the allowed lower-case letters, numbers and hyphens. Select the available publish or update action once and inspect its result. After any address change, check old links and the actual public page. A hosted address is not a domain purchase.
Set the business presentation
Under Branding & Theme check Business Display Name. Use Upload a logo or Replace logo, or the offered logo-creation control if appropriate. The stated upload limit is 5 MB for the listed image formats. Uploading does not replace the final branding save.
Choose colour and theme
Use Brand Colour and Website Theme. Match my colours to this logo can suggest a colour. Check the displayed contrast guidance and the actual button text on the public page. Choose a readable colour and avoid relying on colour alone to convey information.
Save and inspect
Select Save Branding and wait for the success message. Use View Live Site when offered. Check the actual page's business name, contact routes, logo and legibility on your own device. A success toast is not a substitute for opening the public result.
Check enquiry handling and privacy
Review Business profile for Public phone number, Public and reply email and the full-address checkbox. Any published enquiry route should lead to the correct business. Check Leads for real enquiries, and keep marketing photos free of private customer details.
Prepare completed work privately
Under Completed work and service areas choose the completed job and Prepare draft. This creates or opens a private text-only draft. It does not publish the job, private address or photos. Select Review, replace any placeholder with the actual public description and inspect Website preview.
Approve only checked work
Confirm the customer permission and final-copy privacy boxes only when true. Select Approve and publish once, wait for the result and inspect the public page. In Approved website work, Remove from website hides the public item without deleting the private job. Older items without clear permission are not shown. Removing an item from the website does not remove it from Bluesky or Threads or from someone's download. Check those sites separately.
Publish reviewed real work photos
The Your website draft editor is text-only. For a real photo, open Marketing and the completed job's Review & publish dialog. Follow procedure 04 to select the exact capture, prepare private photo copies, inspect them, add a photo description and confirm fresh public permission. Select Website gallery deliberately; it supports one reviewed photo per post. Preparing a copy never silently publishes it.
Publish genuine service areas
In Service areas select Add area. Enter Area name, Page address, distinct Local work and services, Coverage and visit arrangements and Services offered. Use only places you really serve. Select Publish this area page only for pages intended to be public, confirm accuracy, and Save areas. Open View for each saved published area and inspect its details. Unpublished, removed or unknown area addresses are not public pages.
Inspect approved public work
Actual application with made-up example details. This website work item appears only after clear approval. The green block is a made-up example; it is not a real customer's work or a claim about workmanship.
Check the result
The page is actually published when intended, or clearly only reserved.
The public page shows the correct business and contact details.
Logo, colours and address visibility have been inspected after saving.
Every public work item has explicit permission and privacy review; service-area pages describe real coverage.
Fault finding
Problems and checks for Reserve or publish the business website
What you see
What to do
The web address cannot be claimed.
Check length and characters, then try a suitable alternative if it is already taken. Do not assume you own a domain just because you reserved a hosted address.
The logo or colour change is not visible.
Select Save branding, wait for the result, then reload the public website.
A free account has an address but no live website.
Reservation and publication are different. Read the upgrade link and plan terms before choosing a paid plan; do not advertise an untested address.
A completed job or town page is not public.
Completion alone does not publish work. Prepare, review and explicitly approve the draft. For areas check Publish this area page and Save areas. Do not fill pages with invented work, generic town claims or private addresses.
Existing-domain notes and existing-mailbox handoff are supported. Domain purchase, automated DNS provisioning and mailbox hosting are not. A saved account, subscription entitlement or accepted send is not proof of external delivery.
Before you start
Know which connection you actually need: payments, accounting, website, email, texts or social channels.
Keep your existing domain and mailbox working while investigating a change.
Do not give domain, email or social-account passwords to support, or enter them simply to explore the screen.
Procedure
Check the active business
Open Connections under Setup and confirm the business. Read each card's detail, not only its status label. A failed status read is unknown, not disconnected. Retry when online and keep existing services intact.
Choose the task you actually need
Use Payments for card-payment setup, Invoices for Export Xero CSV, Your website for public pages, Your business online for your main email and sending method, and Messaging & SMS for texts. In Settings, Integrations, manage saved social settings. Billing pays for PipeworkHQ itself; it does not connect your customer-payment account.
Keep a domain you already own
Open /dashboard/domains to the same Your business online task. Save the domain as a note if useful. A previously saved domain marked active is not independent proof of routing. The current task supplies no registrar purchase, DNS-token wizard, certificate provisioning or mailbox creation.
Keep your current website and mail working
Do not change nameservers, MX records or mailbox subscriptions. Keep your existing website and email working, or publish a separate PipeworkHQ website. Connecting your own domain is coming soon; there are no DNS settings to copy from this screen.
Use existing mailboxes deliberately
Choose the main customer email and open its usual mailbox to read and reply. This does not move other addresses or combine inboxes. Advanced SMTP is for sending only and needs the exact details from your email company plus a test you have agreed to send.
Check external results separately
For Stripe, check card charges, payouts and the actual payment. Direct accounting links and automatic posting are not available, so use Invoices, Export Xero CSV. Social Settings saved, unverified does not mean sign-in or publishing worked. A saved Companies House number has not been checked automatically. For messages, read Queued, Sent, Delivered, Failed or Unknown before trying again.
Check the result
Each card distinguishes a saved note or credential from a checked outcome; failed reads remain unknown.
The current website and mailbox remain usable.
No simulation, saved token or generic Connected label has been treated as proof of live delivery.
Fault finding
Problems and checks for Check connections and keep your existing domain
What you see
What to do
The hub cannot check connections.
Retry or open the relevant settings. Do not disconnect a working outside service simply because PipeworkHQ could not read its status.
You expected to buy a domain or create mailboxes.
Buy and manage those through your chosen domain and email companies. PipeworkHQ can save a domain note and your chosen customer address, but it does not create either service.
A saved connection looks ready but nothing arrived.
Check the actual message, payment or post. Saved settings do not prove it worked. If the result is uncertain, check the receiving service before trying again.
Export a Xero-format invoice file today. Direct Xero, QuickBooks and FreeAgent connections are coming soon. A saved choice is not a working connection.
Before you start
Have your accounts operator confirm the business's actual VAT status, number and scheme.
Reconcile invoices, payments, credit notes and supplier records before relying on summaries.
This section explains controls only. It does not determine tax rates, registration duties, eligibility or filing requirements.
Procedure
Maintain VAT settings
In Settings open VAT. Set Is your business VAT registered? to the correct answer, enter VAT number if applicable and choose the actual VAT scheme. Select Save VAT details. Do not choose a scheme merely because it is a default or an example in the interface.
Check the underlying documents
Inspect invoice and quote line rates and any manual-rate warning. Automatic classifications and labels are not a decision about the correct tax treatment. Check the saved document and the transaction evidence with the person responsible for your accounts.
Export the invoices
In Invoices select Export Xero CSV. The file downloads with a dated Xero_Invoices_Export filename. This is a Xero-format invoice file, not a complete business archive or a live connection. Do not assume the on-screen search or status filter limits the export: the export request is for the business.
Check before importing into accounts
Open the Xero-format file and check invoice numbers, totals, adjustments and any files already imported with your accountant or bookkeeper. Keep a note of the filename and date period so no invoice is imported twice. Do not assume QuickBooks or FreeAgent accepts the same file unchanged; follow that software's own import instructions.
Run a date-range summary
Select VAT Summary, enter Start Date and End Date and choose Calculate Return Summary. Review Gross Sales, Net Sales, Credit Note Deductions and the displayed VAT breakdown. Check period boundaries and source records; this view alone is not a complete or submitted VAT return.
Read saved accounting settings correctly
Connections and Settings, Integrations may show the accounting software you chose, but this is not a live connection and does not send invoices. Direct connections and automatic posting are not available. Use Invoices, Export Xero CSV as explained above. Set up your bank connection in your accounting software.
Use numbering controls only for a known correction
Configure Numbering & Gaps opens Invoice Numbering Controls. Set Next Sequence Number or Record a Sequence Gap Number only under the direction of the responsible accounts operator, then check the result after Apply Config. These are correction tools, not routine formatting preferences.
Check the result
The saved VAT details agree with the business's actual accounting records.
The export has been reconciled and not imported twice.
No one has treated a saved VAT setting, summary or accounting choice as an HMRC submission.
Fault finding
Problems and checks for Export invoices and maintain VAT records
What you see
What to do
The summary differs from the accounts.
Check date range, invoice status, credit notes and manual tax selections. Escalate the discrepancy with document references; do not change real transactions merely to force a matching total.
A saved accounting preference is not posting invoices.
Saved settings do not send invoices automatically. Use Invoices, Export Xero CSV and check it before importing. Do not remove working account details simply because one status check failed.
You need to file a return or recover a full archive.
Use your accountant or accounting software for filing. Use Your data for the full business export; it is separate from Export Xero CSV.
Ask Mate about your jobs, invoices and customers. It can show links to the records you are allowed to open. It cannot change your records. Check its answer before acting.
Before you start
Use an account with access to Mate and the intended active business.
Ask about saved jobs, invoices, leads or customers rather than expecting live web research.
Keep engineering decisions and regulatory rulings outside chat.
Procedure
Open Ask Mate
Choose Ask Mate. If Mate is locked, read the access message and ask the owner to check the plan or feature access. Do not assume a visible menu entry means the feature is enabled.
Ask a focused question
Use a concrete question such as What's on this week?, Which invoices are unpaid? or Which leads still need a call? Add a job or customer reference when names could be ambiguous. Do not enter passwords, payment-card details or private access links.
Read the answer and evidence
Select Send and wait for the response. Check From your records and open the cited records where provided. Confirm dates, amounts and identity against the actual record before calling a customer, allocating work or recording payment.
Use reading support
Select Read aloud where available to hear a response; Stop stops reading. Audio playback is a reading aid, not a different or more authoritative answer.
Make changes through normal screens
Mate can only look up information. It never creates, changes or sends records or messages. To make a change, open the relevant job, invoice, lead or customer screen and complete the steps yourself.
Handle poor signal
Offline, Mate may return a relevant section from the cached guide or say it cannot find one. This is not a fresh lookup of current business records. Reconnect and ask again before relying on current schedules or balances.
Check the result
The answer identifies supporting records where available.
Any consequential fact has been checked in its source record.
No action has been assumed to happen merely because it was requested in chat.
Fault finding
Problems and checks for Ask Mate about your business records
What you see
What to do
Mate cannot answer.
Check connection and workspace access, then ask a narrower question with a record reference. Use the ordinary record list if needed.
The answer seems wrong or incomplete.
Inspect the cited record and report the discrepancy. Do not change records to match the answer.
You need technical safety advice, a regulatory ruling or current web information.
Mate does not provide those services. Use the applicable authoritative material and your normal competent decision process outside chat.
The page relies on an already configured apprenticeship. Progress calculations and mentor approval are records, not external qualification or funding approval.
Before you start
Have an active apprenticeship configured in the business and the appropriate learner or mentor access.
Agree the training record requirements with the employer or training provider.
Record real learning and time; this manual does not set qualification, funding or training-hour rules.
Procedure
Choose the apprenticeship
Open Apprentice. Where offered, use Select Apprentice to choose the correct person. Check Apprenticeship Profile, Mentor, Standard Ref and Nation. If no active apprenticeship is configured, ask the employer or support to arrange it; there is no complete setup form on this page.
Start a learning entry
Select Log Learning, or use Log OTJ Entry from a job where shown. In Log Reflective Learning enter Activity Title, Date, Duration (Minutes) and Activity Type. Use the actual date and learning duration, not the entire visit automatically.
Describe the learning
Complete What did you learn? with a meaningful reflective note. KSB Mappings is optional and comma-separated; use agreed knowledge, skill and behaviour references, not guessed codes. Describe new learning rather than attendance alone.
Save or submit deliberately
Select Save Draft to retain an unfinished entry or Submit Review when ready for review. Check the resulting status in Verified Learning Log. A draft or submitted entry is not an approved entry and should not be described as verified training.
Review as mentor
In Sign-Off Pending Queue inspect the title, duration and reflective note. Add Sign-off Review Notes and select Approve or Reject as appropriate to the actual evidence. Do not approve solely to remove a shortfall warning.
Check progress and export
Use the status and activity filters to review the log. Compare verified, pending and draft figures. Export Evidence Pack is offered to non-apprentice users and is disabled until at least one entry is mentor-approved. The authorised reviewer selects it and checks the returned file or link. Confirm the receiving training provider's acceptance separately.
Check the result
The entry belongs to the right learner and records actual learning.
Its status is correctly distinguished as draft, submitted, approved or rejected.
Any exported pack is checked and is not presented as a qualification award.
Fault finding
Problems and checks for Record apprentice learning and mentor review
What you see
What to do
No active apprenticeship is configured.
Ask the employer or support to configure the record. Creating a normal Team apprentice membership alone is not proof that the training profile is set up.
The entry cannot be submitted.
Provide an activity title and a meaningful reflective note, then check the other required fields and your access.
Progress shows a shortfall or no applicable requirement snapshot.
Review the configured standard, nation and approved evidence with the employer or training provider. Do not invent hours or claim the app has certified compliance.
Automatic review sending is coming soon. You can save your Google review link and check planned requests, but a waiting request is not a sent message.
Before you start
Use accurate completed-job and customer contact records.
Have the business's own Google review link and sign-in access to any listing you intend to manage.
Respect customer preferences and use a consistent review process; this manual is not legal marketing advice.
Procedure
Read the review queue
Open Reviews & growth, headed Growth & Retention Engine. In Review Requests Queue inspect What has been sent. Search by customer or request reference and use the filter to distinguish Waiting to send, Queued for delivery, Sent, Stopped and Failed.
Set the business-wide preference
Review Automatic review requests and the Send review requests automatically control. Save the intended on/off preference through the control. The screen describes one request after completed work, but an enabled setting or queued item is not proof that the release-tested delivery service has sent it.
Record a genuine exception
Use Stop this one (needs a reason) only for an actual reason represented in the list, such as a refusal, wrong contact details or duplicate record. Choose the accurate Reason and select Skip this invitation. Do not use the control to select only customers expected to give favourable reviews.
Set the review destination
Open Local listings. Paste your own HTTPS Google review link into Google review link and select Save Link. Check that it opens the correct business's review destination. This saves a link; it does not create reviews or edit the Google profile.
Open each local listing
Use Open listing for Google Business Profile, Bing Places or Apple Business Connect and make changes on that company's website. The checklist records your progress only. Check service areas and keep a home address private when required. PipeworkHQ does not claim, verify or edit those accounts for you.
Inspect campaign and source information
Marketing & Service Campaigns shows quote follow-ups and flagged appliance-related opportunities. Directory ROI Tracker summarises recorded acquisition sources and revenue. Use these as prompts to inspect the underlying records, not guaranteed returns or evidence of an automatically sent campaign.
Check the result
Review requests have the correct contact details and an understood delivery state.
Any stopped invitation has a factual recorded reason.
The saved review link and each public listing refer to the right business.
Fault finding
Problems and checks for Manage review requests and local listings
What you see
What to do
Review requests stay queued.
Check the request state and the feature's release-testing status. Do not promise delivery based on the toggle; report persistent failures without repeatedly triggering requests.
Run Daily Growth Engine is unavailable.
That control is platform-admin-only. Normal customer operation does not require bypassing it.
A listing checkbox is complete but the business is not verified.
Complete and verify the listing on Google, Bing or Apple. A tick in PipeworkHQ does not verify the public listing.
The plan controls access. You can create, edit and cancel service contracts. Before relying on an automatic renewal, check a complete authorised renewal and its invoice. Pay by bank is not available on this screen.
Before you start
Have the required Service Contracts entitlement and the correct customer record.
Agree the cover, price, term and any automatic renewal with the customer outside the form.
This screen records a service arrangement; it does not supply legal contract advice, insurance cover or a bank-payment mandate.
Procedure
Open the register
Choose Contracts when available. In Service Contracts inspect the current list and Filter by status before adding a new arrangement. Use Refresh if you need the latest state.
Create the record
Select New contract. Enter Contract name, choose Customer and add Technology if useful. Choose Coverage scope to match the actual agreement, not simply the broadest available option.
Set price and term
Under Pricing & term choose Billing cycle, enter the price for that cycle, Duration (months) and Start date. Check whether the price is monthly or annual before saving. Record relevant Notes without including private credentials.
Record renewal consent accurately
Automatically renew & invoice — customer opted in must be selected only if the customer has agreed to that arrangement. Leave it unticked otherwise. A checked box is your record of consent, not the means of obtaining it.
Save and review renewals
Select Create contract and check the saved customer, coverage, price, billing cycle, renewal date and status. Read Upcoming renewals and check the actual jobs and invoices created when a renewal is processed. Auto-renews is not evidence of a collected payment.
Edit or cancel carefully
Use Edit on the intended contract and Save changes after reviewing the effect. The customer cannot be changed on an existing contract. Use Cancel contract only for the intended arrangement, enter a factual reason if useful and confirm. Check the saved state and separately resolve any existing invoice or customer communication.
Check the result
The saved terms match what the customer agreed.
Automatic renewal is enabled only with actual consent.
Renewal, invoice creation and money received are each checked separately.
Fault finding
Problems and checks for Create and maintain service contracts
What you see
What to do
Contracts is missing or locked.
Ask the owner to check the Professional-level or explicit feature entitlement. Do not assume the menu can be enabled through a different URL.
The customer is wrong on a saved contract.
The edit form cannot change the customer. Stop before further processing and arrange the appropriate cancellation and correct record with the responsible operator.
A renewal is due but no invoice or payment is evident.
Refresh, inspect the contract and Invoices, and report the reference. Do not assume automatic invoicing or charging happened from the label alone.
Save the current page's work before creating a hand-off.
The other device must sign in as the same PipeworkHQ user and retain access to the business.
Procedure
Use the optional install offer
During onboarding, Add PipeworkHQ to your home screen offers Install PipeworkHQ on your device when supported. Confirm in the browser and wait for its installation confirmation. Skip for now and Continue to dashboard remain valid choices; installation is optional.
Install through the browser if needed
On iPhone or iPad, use the browser's Share menu, Add to Home Screen and Add where available. On other supported browsers, look in the browser menu for Install app, Add to Home screen or Add to Dock. These are browser functions; there is no app-store download in this flow.
Save before moving
Complete the screen's Save action and check success. Use Continue elsewhere in the dashboard menu or header. The dialog says Continue on another device and provides a QR code and Copy one-time link.
Redeem the hand-off
Open the code or copied link on the other device. Sign in as the same user if asked. The link works once and lasts fifteen minutes. It checks access, selects the saved task's business and opens that screen. Allow browser storage when required so the business can be selected. It does not copy unsaved typing, a local photo preview or the whole browser session.
End unused hand-offs
Use Close and revoke handoff when an unused link should stop working. Treat the link as private. If it has expired or been used, return to the source screen and create a fresh hand-off after checking the saved work.
Distinguish phone capture
Snap from phone on a job is a separate ten-minute photo-upload session that does not require phone sign-in. Continue elsewhere is a signed-in task hand-off. Choose the one you intend and close the session afterwards.
Work with poor connectivity carefully
An installed shortcut is not a promise that every form works offline. Wait for explicit save confirmations and check records again after reconnecting. Mate's cached-guide fallback is narrower than full offline job management.
Choose whether this device keeps saved copies
On a shared phone or computer, choose Use online only when asked. On your own locked device, you can allow saved copies of customer records; these may remain after sign-out. Change the choice in Settings, Security & Audits, Saved records on this device. Finish open work first and get online. The app checks pending saves before reopening the page. Changing this choice does not delete older copies. If you previously worked without a signal, use the same private device and browser, allow saved copies and check the records after reconnecting. Do not clear browser data while work may still be waiting.
Check the result
The installed shortcut opens the intended business site.
The receiving device opens the correct saved record under the same user.
No unsaved work or expired link has been relied on as transferred.
Fault finding
Problems and checks for Install on a device and continue a saved task elsewhere
What you see
What to do
The browser does not offer installation.
Use the normal website or the browser's own install menu if available. The app does not claim installation until the browser confirms it.
The hand-off is expired, already used or belongs to another user.
Sign in as the correct user and create a fresh link from the saved task. If told to allow browser storage, enable it for the site before creating another link. Do not reuse someone else's link.
Recent form entries are missing on the other device.
Return to the original device and check whether they were saved. Hand-off transfers a saved destination, not unsaved form state.
Only the owner can request the ZIP file and receive its time-limited download link. Anyone with that link can use it until it expires or the file is removed. Keep both private. Restoring an account from the file is not a self-service feature. Requiring two-step sign-in for every team member is coming soon.
Before you start
Keep the affected job, invoice or customer reference and the approximate time of the problem.
Use the business owner's account for full data exports.
Do not include passwords, access keys, full payment-card details, private quote links or unnecessary personal information in a support report.
Procedure
Open help or report a problem
Open Help & support at /dashboard/help. Choose Customer manual for these instructions or Contact support to open /dashboard/support. For a report, select Something is broken, An idea / suggestion or A question as appropriate.
Send a concise report
Enter Summary and, if useful, What happened? Include the screen, action, expected result and actual result, plus a non-secret record reference. Select Send report and wait for Thanks — report sent. The report attaches the page address, browser, screen size and recent diagnostic messages from that page; inspect anything you add yourself for private data.
Request a full business copy
Open Your data at /dashboard/data. Under Export your data, select Prepare my export or Prepare a fresh export. Only the owner can request it and receive the download link. Wait for Ready to download, using Refresh export status if needed. Anyone with the link can download the file until it expires, so keep it private.
Download and verify the archive
Select Download ZIP and check that the file opens. It contains business records and uploaded files, but leaves out passwords and other security details. Store it somewhere only authorised people can open because it contains customer information.
Respect export expiry and scope
The archive is retained for twenty-four hours. Anyone holding a download link can access the archive until the link's ten-minute expiry or the archive is removed. Do not paste that link into messages, public pages or support reports. Revoke and delete removes the prepared archive, not the customer database, and cannot recall copies already downloaded. Prepare a fresh export if the archive is unavailable. Export Xero CSV is separate in Invoices; customer import is available through Your data.
Review access and audit records
In Settings, Security & Audits, inspect Audit Logs for recent administrative and security-related actions. Review Team membership regularly and use Sign Out on shared devices. Never share your own account to give a colleague access.
Understand the MFA limit
Require MFA for all members currently records a preference only. The screen marks enforcement Coming soon and explicitly says it does not block members without MFA. Do not rely on that switch as an active security control. Keep devices and individual account credentials protected.
Escalate unresolved data issues
If an export fails, keep its job reference and use support; nothing should be treated as complete until a usable archive is available. For corrections, retention or deletion requests without a self-service control, contact support and agree the specific scope. Do not confuse deleting an export with deleting business records.
Check the result
The support report has a success confirmation and contains no secrets.
The downloaded archive opens and is stored securely.
Membership, historical records and MFA preference are understood without assuming unreleased enforcement or automatic restoration.
Fault finding
Problems and checks for Get support, export data and protect access
What you see
What to do
The report does not send.
Check the required Summary and connection, then retry once. Keep a local note of the issue without secrets. If it persists, return to Contact support at /dashboard/support and include the approximate time and any non-secret error reference.
The export link expired or preparation failed.
Refresh status or prepare a fresh export. If it fails again, report the export job reference. Do not send the private download link to another person as a workaround.
You need proof of an action or stronger account protection.
Inspect the relevant record history and available Audit Logs, and raise a specific support request. The current MFA preference switch is not enforcement, and the manual does not claim otherwise.